


As an affiliate, I earn from qualifying purchases, but this doesn't affect the reviews or recommendations—your trust is important to me!
Creating Bubble Painting Art Project: A Step-By-Step Guide

Today, We're Making:
- - Bubble Painting Art Project
- - 'Time Capsule Project' - For this fun craft, children can create a time capsule filled with items that represent their life in the year 2025. They can include written notes, photos, a small object, or drawings. The capsule can be an inexpensive container such as a shoebox or a glass jar.
Imagine the Joy of Bubble Painting
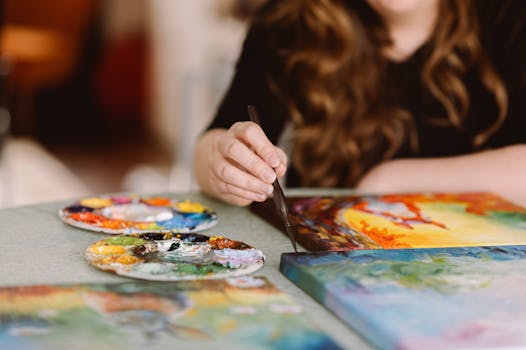
Imagine you're holding a paintbrush, a canvas in front of you, craving to unleash your creative energy. But what if you're yearning for something more exciting and unique compared to the regular painting techniques?
Well, here's a brilliant idea for you- Bubble Painting Art Project! It's an exciting DIY art form that even beginners can master, and the result, as always, leaves you in awe of your creative prowess. It's not just a fun art project; it invigorates a sense of joy, freedom while popping colorful bubbles on the canvas.
A Comprehensive Guide to Creating Bubble Art
This blog post brings you a comprehensive, step-by-step guide on creating bubble art, an easy, yet exquisite art project that you'd love to explore. So, ready to venture into the joyous and vibrant world of bubble painting?
Getting Started With Bubble Paint
Starting your Bubble Painting Art Project is simpler than you might think, and the good news is that you probably have most of the items you need at home already. You might like to create a dedicated workspace for your artistic endeavor, like a corner of your kitchen table or perhaps the garage if you're worried about a potential mess! The first steps in the creation process involve preparing your Bubble Painting materials. You'll need some paint - any type will do but washable paint works best especially if kids are joining in. Also, gather a couple of straws, dish soap, cups for mixing your homemade bubble paint, and last but not least, your canvas.
DIY Bubble Painting: Mixing Your Paint
After setting up your workspace, the next step in your DIY Bubble Painting journey is to mix your paint. This stage might seem complex, but trust me, it's not. Simply pour a small amount of paint into your cup, add a squirt of dish soap, and a splash of water. Stir until it's well mixed. You’re aiming for a thin, bubble-friendly consistency but bear in mind that too much water will dilute the paint and reduce the vibrancy of your art project. This step is all about finding the right balance and creating the perfect homemade bubble paint. Remember, there are no mistakes in art, only discoveries!
Creating Bubble Art: Mastering The Technique
Now, let's get down to the bubble art techniques. Almost at the halfway point in our step-by-step guide, it's time to put that straw to use. Dip it into your paint mixture and blow gently to create bubbles. When the bubbles rise above the cup rim, gently press your canvas onto the bubbles. As they burst, they'll leave whimsical patterns and unique painting ideas on the canvas. Please remember, it's essential not to inhale through the straw – we're making Bubble Painting Art, not taste-testing our projects!
Fun Art Projects: Adding A Personal Touch
Perhaps the greatest delight of DIY Art lies in the chance to infuse your personality into the work. Make your Bubble Painting Art Project distinctly yours by experimenting with different colors. Add a splash of red here, a dab of blue there, or mix colors to create new shades! Feel free to blow smaller or larger bubbles, create separate zones of color, or overlay different colors for a multi-dimensional effect. No two Bubble Art projects will look the same, much as there are never two identical bubbles! You're discovering the joy in color, the freedom of expression, and the wonder of effortlessly turning bubbles into an artistic masterpiece.
As we wrap up...
Remember, there's uncharted beauty within you, waiting to burst forth in a cascade of vibrant colors in your Bubble Painting Art Project. It's in the way you mix your paints, in the careful precision of blowing the bubbles, and in the joyful anticipation of the unique patterns each popped bubble creates.
This wonderful art technique gently teaches patience while allowing your creativity to bubble over. Embrace the process, make a mess, have fun, and create something you're proud of. You're not just creating art, you're also creating memories.
So, let's dive in – because when it comes to bubble painting, the world is your canvas!

You May Also Like These:
Time Capsule Project
Help your child explore the concept of time and deepen their understanding of their own experiences by creating a whimsical time capsule. This is a fun and engaging craft activity suitable for children age 5 and above.
Ingredients
- A durable container (like a shoebox or an old jar)
- Art supplies (stickers, markers, paint, glitter, etc.)
- Paper/Brown Kraft paper
- Glue/Tape
- Personal items (photos, drawings, favorite toy, etc.)
- Pen/Pencil for writing
Instructions
- Choose Your Container: Start by selecting a durable container to house your time capsule. You can use an old shoebox, a mason jar, metal tin, or anything else you have on hand that can be sealed.
- Decorate Your Time Capsule: Allow your child to personalize their time capsule by decorating it with art supplies. They can paint it, draw on it, stick stickers, or even add some glitter to make it sparkle.
- Choose What to Include: Next, choose a set of items that represent your child's life at this particular moment. This could include a recent photo, a drawing, a favorite toy, or a note to their future self. It is really up to your child to decide what they would like to include.
- Write a Note: The time capsule can also include a letter to your future self. Ask your child to write about their current interests, friends, and dreams for the future. This can be a great way for them to reflect on their lives.
- Seal Your Time Capsule: Once all items are collected, place them carefully into the container and seal it. Make sure it's secured well so that none of the items fall out.
- Bury/Hide Your Time Capsule: The next step is to decide where to hide your time capsule. It could be buried in the backyard or simply hidden in a safe place in your home. Pick a date in the future for when it will be opened.
- Remember the Location: The last step, and possibly the most important, do not forget where you hid it!
This Time Capsule project not only prompts creativity but also a great way to make a meaningful connection between past, present, and future! Enjoy!
Crafts for Photos
Ingredients
- Your selected photos
- Paper (your choice of color)
- Scissors
- Glue
- Paint and brushes
- Ribbon or string
Instructions
- Select your photos: Choose the best photos to use for your craft.
- Prepare your paper: Select the color and size of the paper.
- Cut your photos: Trim your photos to the size you want.
- Stick your photos: Using the glue, stick your photos to the paper.
- Decorate: Use your paint and brushes to add a unique design around your photos.
- Add a Ribbon: Attach a ribbon or a string to hang your photo.
Crafts for Photos Instructions
Materials Needed:
- Photos of choice
- Cardstock or craft paper
- Scissors
- Pencil
- Glue or adhesive tape
- Decorative elements (ribbons, stickers, glitter, etc.)
Instructions:
- Select the photo: Choose the photo you want to use for the craft project.
- Prepare the materials: Gather all required materials. Make sure your craft paper, scissors, pencil, glue or adhesive tape, and decorative elements are within reach.
- Plan the layout: Plan the design of your craft. You can sketch it on a separate piece of paper to serve as a guide.
- Trace and cut: Using your pencil, trace the design onto your cardstock or craft paper, then carefully cut it out with your scissors.
- Decorate: Customize your cut-out with your decorative elements. Use your creativity!
- Attach the photo: Apply the glue or adhesive tape to the back of your photo, then attach it securely to your craft.
- Let it dry: Allow sufficient drying time, if necessary.
- Display your craft: Enjoy your personal, hand-crafted photo decoration. Display it as desired!
Crafts for a Small Object: DIY Miniature Sailboat
Ingredients
- Sculpey clay
- A small wooden stick
- Fabric for sail
- Paints and paintbrush
- Glue
- Scissors
Instructions
- Start by molding the Sculpey clay into the shape of a small boat.
- Allow the clay to dry completely. This could take anywhere from a few hours to a whole day depending on the size of the boat.
- Once the clay is dry, use the paints to color your sailboat. Allow the paint to dry.
- While waiting for the paint to dry, cut your fabric into a triangular shape to make the sail. The size will depend on the size of your boat and stick.
- Glue the wooden stick to the middle of the boat. Allow it to dry completely before proceeding to the next step.
- Finally, fix the sail to the wooden stick by glueing it on. Allow this final assembly to dry.
Crafts for Kids: Creating a Shoebox or Glass Jar Capsule
Ingredients:
- A clear glass jar or shoebox
- Coloured paper
- Craft glue
- Scissors
- Small trinkets or keepsakes
- Decorative items (optional)
Instructions:
- Gather all the materials: Start by collecting all the necessary materials mentioned in the ingredients list. Ensure they are safe for kids to handle.
- Prepare the Container: Clean the shoebox or glass jar thoroughly and let it dry.
- Design Your Container: Cut out colourful shapes or designs from the coloured paper. Use craft glue to stick these pieces to the outside of your container. Alternatively, you could directly draw or paint on the surface.
- Add the Trinkets: Place your collected trinkets or keepsakes into the container.
- Seal it: Once full, securely fasten the lid or close the shoe box. If you're using a jar, ensure it's air-tight.
- Decorate (optional): If you like, you can tie a bow or define the outside of the box or jar with markers or stickers for an added touch.
- Admire Your Work: Well done! Your Kids' Capsule is ready! These make wonderful gifts or keepsakes to remember special times.