


As an affiliate, I earn from qualifying purchases, but this doesn't affect the reviews or recommendations—your trust is important to me!
Creating Fun DIY Crafts, Recipes and Indoor Games For Kids

Today, We're Making:
- - DIY Bird Feeder Craft
- - Homemade Lava Lamp STEM Experiment
- - Mini Personal Pizzas Cooking Recipe
- - Indoor Treasure Hunt Game
- - DIY Time Capsule Craft
- - Balloon Rocket STEM Experiment
- - Easy No-Bake Cookie Recipe
- - DIY May Day Flower Basket Craft
- - DIY Board Game Creation
As the rain dribbles faintly against your window
And your energetic little ones are keen on bouncing about with boundless energy, you might be wondering how to keep them content and occupied indoors. Welcome to the world of DIY crafts for kids! With a pinch of creativity and a dash of patience, you can transform your living room into a realm of enchanting adventures.
Embarking on this creative journey
Not only deepens your bond with your tiny tots, but it also helps in boosting their cognitive skills, patience, and creativity. Whether it's helping them embark on a fun-filled indoor treasure hunt game, getting their hands messy with a homemade lava lamp STEM experiment, crafting a DIY bird feeder, or even whipping up delightful mini personal pizzas, there's something exciting for every little explorer at heart.
So, dive into our treasure trove of kids' craft ideas and easy DIY projects
And turn gloomy indoor days into memorable family fun times!
DIY Bird Feeder Craft
Living room turned into a bustling aviary, anyone? This DIY Bird Feeder Craft can be an exceptionally fun and kid-friendly way to bring chirping joy to your window. This creative craft idea ties in beautifully with lessons on nature, sustainability, and respect for our feathered friends. Keystone in the world of DIY crafts for kids, using simple items like bird seeds, gelatin and string will pave an enchanting amusement for kids and an invaluable lesson on empathy towards animals. But remember, the laughter and memories you make while creating these homemade crafts will echo much longer than the rustling wings of your hungry guests!
Homemade Lava Lamp STEM Experiment
Next up on the list of astonishingly fun crafts is the Homemade Lava Lamp STEM Experiment – a bewitching amalgamation of art and science that will leave your kids fascinated. This kids’ activity is charged with vibrancy, wonder, and a dash of magical chemistry. All you need are transparent containers, vegetable oil, food coloring, and Alka-Seltzer tablets. Watch as your little explorer's eyes light up as dazzling, colored blobs start to whizz around, making indoor activities for kids a total delight. With this simple DIY craft, you are not just creating a mesmerizing spectacle but are also helping your kids comprehend some fundamental scientific concepts. Plus, the overflow of excitement from this experiment is the perfect remedy for those rainy day blues.
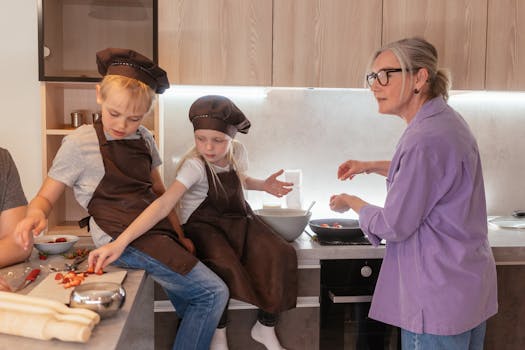
Mini Personal Pizzas Cooking Recipe
Moving over to the scrumptious side of family fun, let's dive into the Mini Personal Pizzas Cooking Recipe. Sprinkling cheese, scattering olives, and spreading tomato sauce - cooking together is an ultimate fun indoor game. Not only will it be a delicious indulgence, but it will also be a great opportunity to sneak in a lesson about the importance of nutritional balance. Home baking for kids is not merely a process, it's a dash of creativity, a sprinkle of team work, and a whole lot of fun. The best part is, your little chefs will gleam with pride as they gobble down their self-made culinary delights!
Indoor Treasure Hunt Game
Last but certainly not least in our family activities lineup is the timeless Indoor Treasure Hunt Game - a brilliant way to keep your small adventurers busy and their imaginations sparked. Unlike most children's indoor games, this homemade game needs no fancy equipment or complicated setup. Use household items as treasures and let the fun begin! This activity requires strategic thinking, problem solving, and creates an adrenaline rush that children love. The indoor treasure hunt game is not just an easy indoor game but it’s also a wonderful way of learning, challenging, and most importantly, enjoying. Who knew staying at home could be this much fun?!
Keeping Children Occupied Indoors: A Joyful Discovery
And there you have it! From crafting avian bistro in your living room, conjuring pockets of magic with a homemade lava lamp, whipping up personal pizzas to embarking on an exhilarating indoor treasure hunt - keeping children occupied indoors can indeed be an unscaled mountain of joy and discovery. Not only does it feed their inexhaustible curiosity, but it also fosters a deep sense of accomplishment and satisfaction in them.
Don't Fret Over Gloomy Weather
So the next time the clouds draw in, don't fret. Instead, seize the day, summon your tiny troopers and transform those droplets tapping at your window into a symphony of laughter, learning, and love!
Staying Indoors Can Be An Adventure
Who knew staying indoors could be an adventure in itself? So come, step out of the ordinary and dive into these irresistible pages of fun and discovery!
You May Also Like These:
DIY Time Capsule Craft
Ingredients & Materials
- 1 Shoe Box or similar container
- Construction Paper
- Glue or Tape
- Marking Pens
- Trinkets / Mementos
- Letters or Notes
- Photos
- Sealing Wax (Optional)
Instructions
Step 1: Decide On the Container
This will serve as your time capsule. A shoebox, metal container, or similar durable items would be ideal.
Step 2: Decorate Your Time Capsule
Using the construction paper, marking pens and glue or tape, let your creative juices flow and decorate your box as you see fit. You can write the date on the outside to remember when it was sealed.
Step 3: Choose Your Mementos
- Choose items like your favorite toy, a drawing, a newspaper clipping or note about a significant event, family photos, or anything else that holds meaning for you.
- Remember, the goal is to capture this moment in time, so think about things that represent you or your family's life right now.
Step 4: Write a Letter
This is a note to your future self. Make it a description of your life as it is now, hopes for the future, or just an explanation of the contents.
Step 5: Seal and Store Your Time Capsule
Once you have placed all your items into the time capsule, it's time to seal it up. You can simply close and tape it, or for added effect, you could use sealing wax. Make sure to store it in a safe and dry place.
Step 6: Wait and Open
Decide on a future date to open your time capsule - this could be in a few years or several decades. The best part about creating a time capsule is the anticipation and surprise that awaits you when it’s finally time to open it.
Easy No-Bake Cookie Recipe
Ingredients:
- 2 cups sugar
- 1/2 cup milk
- 1/2 cup butter
- 1/4 cup unsweetened cocoa powder
- 1/2 cup crunchy peanut butter
- 3 cups quick cooking oats
- 1 tsp vanilla extract
Instructions:
- In a large saucepan, combine sugar, milk, butter, and cocoa. Bring to a boil, and cook for 1 minute. Remove from heat.
- Stir in peanut butter, quick cooking oats, and vanilla extract.
- Drop by teaspoonfuls onto wax paper. Let cool and harden before serving. Enjoy!
Easy No-Bake Cookie Recipe
Looking for a fun and tasty activity to do at home with your kids? Try this easy no-bake cookie recipe!
Ingredients
- 1/2 cup of unsweetened peanut butter
- 1 cup of honey
- 1/2 cup of unsalted butter
- 2 teaspoons of pure vanilla extract
- 3 cups of rolled oats
- 1/2 cup of shredded coconut (optional)
Instructions
- In a saucepan over low heat, melt the peanut butter, honey, and butter until smooth and well combined.
- Remove from heat and add the vanilla extract, rolled oats, and shredded coconut (if using).
- Stir the mixture until the oats are thoroughly coated in the peanut butter mixture.
- Drop spoonfuls of the mixture onto a baking sheet lined with parchment paper.
- Chill in the refrigerator for at least 2 hours, or until firm.
- Enjoy your no-bake cookies!
These no-bake cookies are not only easy and fun to make, but also a sweet and healthy treat that the whole family can enjoy!
DIY May Day Flower Basket Craft
Ingredients:
- Construction paper (variety of colors)
- Scissors
- Glue stick
- Ribbon/String
- Flowers (hand-crafted or real)
- Hole puncher
Instructions:
- Pick Your Paper: Choose your desired color of construction paper for the basket. You may choose multiple colors if desired.
- Cut the Paper: Cut the construction paper into a large square shape. The size depends on how big you want your basket to be.
- Create the Basket Base: Fold the square paper in half diagonally to create a triangle. Fold the triangle in half again making a smaller triangle. Unfold the paper back to the large triangle, there should now be a line marking the center.
- Form the Basket Shape: Bring the two bottom edges of the triangle to meet at the center line. This should create a diamond shape. Fold the bottom half of the diamond upwards, meeting the point at the top. Fold the left and right corners of the remaining triangle backward, creating a basket shape.
- Secure the Basket: Use the glue stick to glue down the folded sections to secure the basket shape.
- Create the Handle: Cut a strip of paper to be used as a handle for the basket. Glue one end of the strip to one side of the basket, and the other end to the other side.
- Prepare for Hanging: Use the hole puncher to put a hole in the top center of your basket handle. Thread your ribbon or string through this hole, and tie it in a knot to secure it.
- Add Flowers: Now you can add your flowers! Hand-crafted or real small blossom flowers can be used. Put them into your basket, flaunting from the top.
Your May Day Flower Basket is now ready for gifting and hanging!
DIY Board Game Creation
Ingredients:- Cardboard (30x30 cm)
- Coloured papers
- Scissors
- Pencil
- Adhesive / Glue
- Ruler
- Acrylic paint / Coloured markers
- 4 Game pieces (Can use lego pieces, buttons or any small items)
Instructions:
Step 1:
- Take the cardboard and draw a square grid of your desired size with the help of the ruler and pencil. Ensure that there are enough boxes for the game to progress.
Step 2:
- Cut out small squares from the colored papers and paste them on the boxes you drew on the cardboard to give a colourful appearance.
Step 3:
- Use the acrylic paint/coloured markers to decorate and add details to your board game. Ensure that the start and end positions are clearly marked.
Step 4:
- Create instruction cards and place them next to the game board. These could involve instructions such as move forward two spaces, skip a turn, etc.
Step 5:
- Use the small items you have as game pieces. Each player selects a piece and positions it at the start.


