


As an affiliate, I earn from qualifying purchases, but this doesn't affect the reviews or recommendations—your trust is important to me!
Creating Your Own DIY Miniature Fairy Garden Terrarium
Today, We're Making:
- DIY Miniature Fairy Garden Terrarium
- Glow-in-the-Dark Starry Summer Night Art: This craft involves creating a spectacular night sky using glow-in-the-dark paint on a piece of cardboard or canvas. Kids can design their own constellations and create unique star patterns.
- DIY 2025 Time Capsule: Using a durable container,kids can assemble objects that represent their lives in 2025,such as photos,letters,small toys or trinkets. They will love burying their time capsule in the garden and looking forward to digging it up in the future.
- Mini Clay Figurines: Kids can create their own fairy tale characters or animals using air-dry clay and paints. These tiny figurines can be placed in the fairy garden terrarium adding a personal touch to it.
- Fairy Wings Decorating: Using recyclable materials like old hangers and stockings or tulle.
Magic is closer than you think!
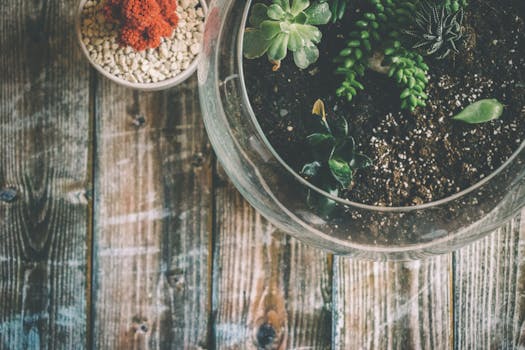
Transforming ordinary houseplants into enchanting realms with a DIY Miniature Fairy Garden Terrarium is a unique and sustainable gardening project perfect for the imaginative gardener. Are you tired of the same old indoor garden ideas? This delightful DIY craft interweaves whimsy and nature, allowing you to fashion your very own fairy tale right at home. Today, we’re going to delve into the creative world of Fairy Garden Design, providing you with Terrarium Making Tips, resources for Fairy Garden Plants, and inspirations for Fairy Garden Themes. So grab your Fairy Garden Kit or accessories and let's venture into the enchanting world of miniature gardening!
DIY Miniature Fairy Garden Terrarium: Let's Get Started
Engrossing and enjoyable, constructing a DIY Miniature Fairy Garden Terrarium offers a delightful break from conventional indoor garden ideas. This unique DIY project beckons you to unlock your creativity and indulge in an immersive experience. Crafting a Fairy Garden Terrarium is about more than just assembling ingredients; it's about creating an environment that captures the enchanting essence of a fairy world.
To embark on this magical endeavor, gather your Fairy Garden Kit, which typically includes a terrarium globe with a stand, pebbles/rocks for drainage, garden soil, moss, and figurines or fairy garden accessories to instill that extra oomph! If you are looking for sustainable gardening alternatives or ideas to repurpose items, consider using an old transparent jar or fish bowl as your terrarium globe. It’s mindful, eco-friendly, and equally charming!
Choosing the Perfect Fairy Garden Plants
Creating your miniature fairy garden comes with its sheer joy, of which selecting the right fairy garden plants forms a crucial part. Choose small, slow-growing plants that love humidity and aren’t too fussy about sunlight. Baby tears, Cryptanthus bivittatus or Earth Star, Fittonia or Nerve Plants, and Golden Moss make for appropriate choices. Remember to choose plants that scale with the accessories you've chosen to ensure your Fairy Garden Terrarium maintains a sense of proportion and stays looking fantastic!
It's All in the Details: Fairy Garden Design Tips
From whimsical to rustic, your Fairy Garden Design can reflect a myriad spectrum of themes. Here are some fun Fairy Garden Themes to consider:
- Enchanted Forest: Incorporating miniature toadstool mushrooms, a fairy swing hanging from a branch, and tiny woodland creatures can offer a charming woodland aesthetic.
- Seaside Retreat: For a breezy, beachy feel, incorporate tiny seashells, a miniature sand-castle or bucket, and plants that mimic seaweed or grass, such as Fern Moss or Irish Moss.
- Rustic Charm: Give your fairy garden a cozy look with miniature cottages, picket fences, and a tiny wheelbarrow or wishing well. Broad-leafed plants like baby rubber plants can provide the illusion of large trees.
Terrarium kits help to keep everything neat, but there's no limit to the DIY Fairy Garden décor you can create. The more you personalize your Fairy Garden Terrarium, the more it comes alive with magic and charm.
Remember, every Fairy Garden is unique, and every creator has their style. Embrace the process, let go of perfection, and let your imagination guide you through the enchanting journey of creating your DIY Mini Fairy Garden.

Fairy Garden Terrarium
And so, dear wanderer into whimsy, we've reached the end of our magical journey. The creation of your own personal Fairy Garden Terrarium is more than a craft project; it's an extension of you, a beautiful expression of your creative spirit crafted in rich soil and lush greenery.
Selecting Your Fairy Garden Theme
Remember, no matter what Fairy Garden Theme you select or what Fairy Garden Plants you choose to nurture, your garden is your own magical offerings to the world.
Displaying Your DIY Miniature Fairy Garden Terrarium
Wherever you display your DIY Miniature Fairy Garden Terrarium, let it be a constant reminder of the inherent enchantment in nature, a celebration of your creativity, and proof that magic is, indeed, within our grasp.
Happy gardening!

You May Also Like These:
Glow-in-the-Dark Starry Summer Night Art
Materials:- Cardboard or Canvas
- Glow-in-the-dark Paint
- Paintbrushes
- Find a flat surface to work on, and lay down newspaper or an old tablecloth to protect the area.
- Place your piece of cardboard or canvas on the flat surface.
- Take the glow-in-the-dark paint and paint a base layer of the night sky onto your canvas or cardboard. You may want to mix blue and black paints to get the desired color of the night sky.
- Once the base layer is dry, begin to paint stars, constellations, and other celestial bodies using your glow-in-the-dark paint.
- Use your own creativity to make unique star patterns and designs.
- Allow the paint to dry completely before displaying your work.
DIY 2025 Time Capsule
Materials:- Durable container (such as a metal or plastic box)
- Various items to include in the time capsule (photos, letters, trinkets, etc.)
- Sealant (such as silicone or hot glue)
- Select a durable container to hold the items you want to keep in the time capsule. Ensure the container is waterproof and airtight to protect its contents.
- Collect materials you want to include in the time capsule, such as photos, letters, newspaper clippings, trinkets, etc.
- Place the items into the container carefully.
- Once your capsule is packed, apply a sealant around the edge of the container. Silicone or hot glue work well for this.
- Place the lid on the container and ensure it is securely sealed. The sealant should be applied in such a manner that it keeps air and moisture out.
- Choose a safe and secure place to store your time capsule until 2025.
Easy Kid's Photo Craft
Materials needed:
- Photos: Your favorite family photos, preferably in a size 4x6 inches or 5x7 inches.
- Construction paper: Pick several colors your child likes.
- Scissors: Safety scissors if your child will be cutting.
- Glue stick: It's less messy and easier for small hands than liquid glue.
- Markers or crayons: For decorating the paper frame.
Instructions:
- Pick out a few favorite photos. This project is a great way to make use of duplicate prints!
- Choose the colors of construction paper you want to use for your frame.
- Cut out a frame from the construction paper. It should be a rectangle larger than your photo, with a rectangle hole in the middle where the photo will go.
- Decorate the frame. Let your child use markers or crayons to draw on the construction paper. This is the part where they can really get creative!
- Glue the photo onto the frame. Make sure you're only applying glue to the back of the photo, not the front.
- Let everything dry. You don't want to handle the photo frame too much while the photo is still drying.
Kids' Photo Frame DIY Craft
Materials Needed:- Scissors
- Glue
- Cardboard
- Colourful wrapping paper or paint
- Decorations - stickers, glitter, gemstones
- Photos
Instructions:
Step 1: Prepare the Frame- Cut a rectangular piece of cardboard approximately the size you want your photo frame to be.
- Cut out a smaller rectangle within this, leaving an even border all around. You now have your basic frame structure.
- If using wrapping paper, cut a piece of wrapping paper slightly larger than your frame.
- Cover one side of your cardboard frame in glue then stick it onto the backside of your wrapping paper. Make sure the decorative side of the wrapping paper is on the visible part of the frame.
- If you're using paint, paint your frame and let it dry completely before moving onto the next step.
- Glue stickers, glitter, gemstones, or any other decorations onto the frame.
- Allow for the frame to fully dry.
- Select your chosen photo and trim it down accordingly so it fits nicely within the frame.
- Using a small amount of glue or tape, secure your photo so it's visible within the inner rectangle of your frame.
- Allow for the frame to fully dry before displaying. Enjoy!
Craft for Letters: A Fun Learning Activity for Kids
Materials Needed:
- Construction paper of various colors
- Scissors
- Glue sticks
- Marker pens
- Safety googles (optional)
- Alphabet stencils (optional)
Instructions:
Step 1: Prepare Your Materials
Start by gathering all the materials you'll need for the craft. This includes the construction paper, scissors, glue sticks, marker pens, safety goggles, and alphabet stencils.
Step 2: Cut Out Letters
Using the scissors, carefully cut out letter shapes from the construction paper. If needed, use the alphabet stencils as a guide.
Step 3: Color the Letters
Use the marker pens to color and decorate each of the cut-out letters. You can use a variety of colors and styles to make each letter unique.
Step 4: Glue the Letters
Use the glue sticks to fix the colored letters on a different piece of construction paper, forming words or sentences. You could also make a collage of random letters if you'd like.
Step 5: Let it Dry
After you're done gluing, let your creation dry for a couple of hours to ensure the letters are firmly attached.
Step 6: Display Your Artwork
Once the glue is dry, you can hang up your letter craft on the fridge or in your child's room. They'll be excited to see their handmade creation on display.
Enjoy the process and have fun as you help your kids learn and get creative with letters!
Mini Clay Figurines
Ingredients:- Air-dry clay
- Acrylic paints
- Paint brushes
- Purchase air-dry clay and choose a variety of acrylic paints.
- Get your child to choose their favourite fairy-tale character or animal.
- Help your child mould the clay into the chosen shape of the character or animal.
- Allow the clay to dry according to the instructions on the packaging.
- Paint your mini clay figurines with your chosen paints, and let it dry again.
- Place your creations in your fairy garden terrarium, or any place your child likes.
Fairy Wings Decorating
Ingredients:- Old coat hangers
- Old stockings or tulle
- Glitter, sequins or any preferred decorations
- Hot glue gun
- Bend and shape old coat hangers into a set of wings.
- Cover the wings with old stockings or tulle. Secure the material with a knot or use a hot glue gun for a more secure attachment.
- Ensure the hanger part is comfortable and positioned well for the child to hold onto or wear.
- Let your child decorate the wings with glitter, sequins, or any other preferred materials using the glue gun.
- Allow the wings to dry completely before playing or hanging them up as decoration.


