


As an affiliate, I earn from qualifying purchases, but this doesn't affect the reviews or recommendations—your trust is important to me!
Creating Your Own Lava Lamp Science Experiment at Home


Today, We're Making:
- - DIY Lava Lamp Science Experiment
- - 'Space-Time Calendar': Encourage your child to build a yearly calendar based on significant events in the history of Science,Technology,Engineering and Mathematics,which happened on the date 04-08. This will enhance their research skills and knowledge about STEM history. They could make their own month-by-month calendars using cardboard and markers.
- - 'DIY Hydroponics and Indoor Garden': On the occasion of celebrating April 8th,2025.
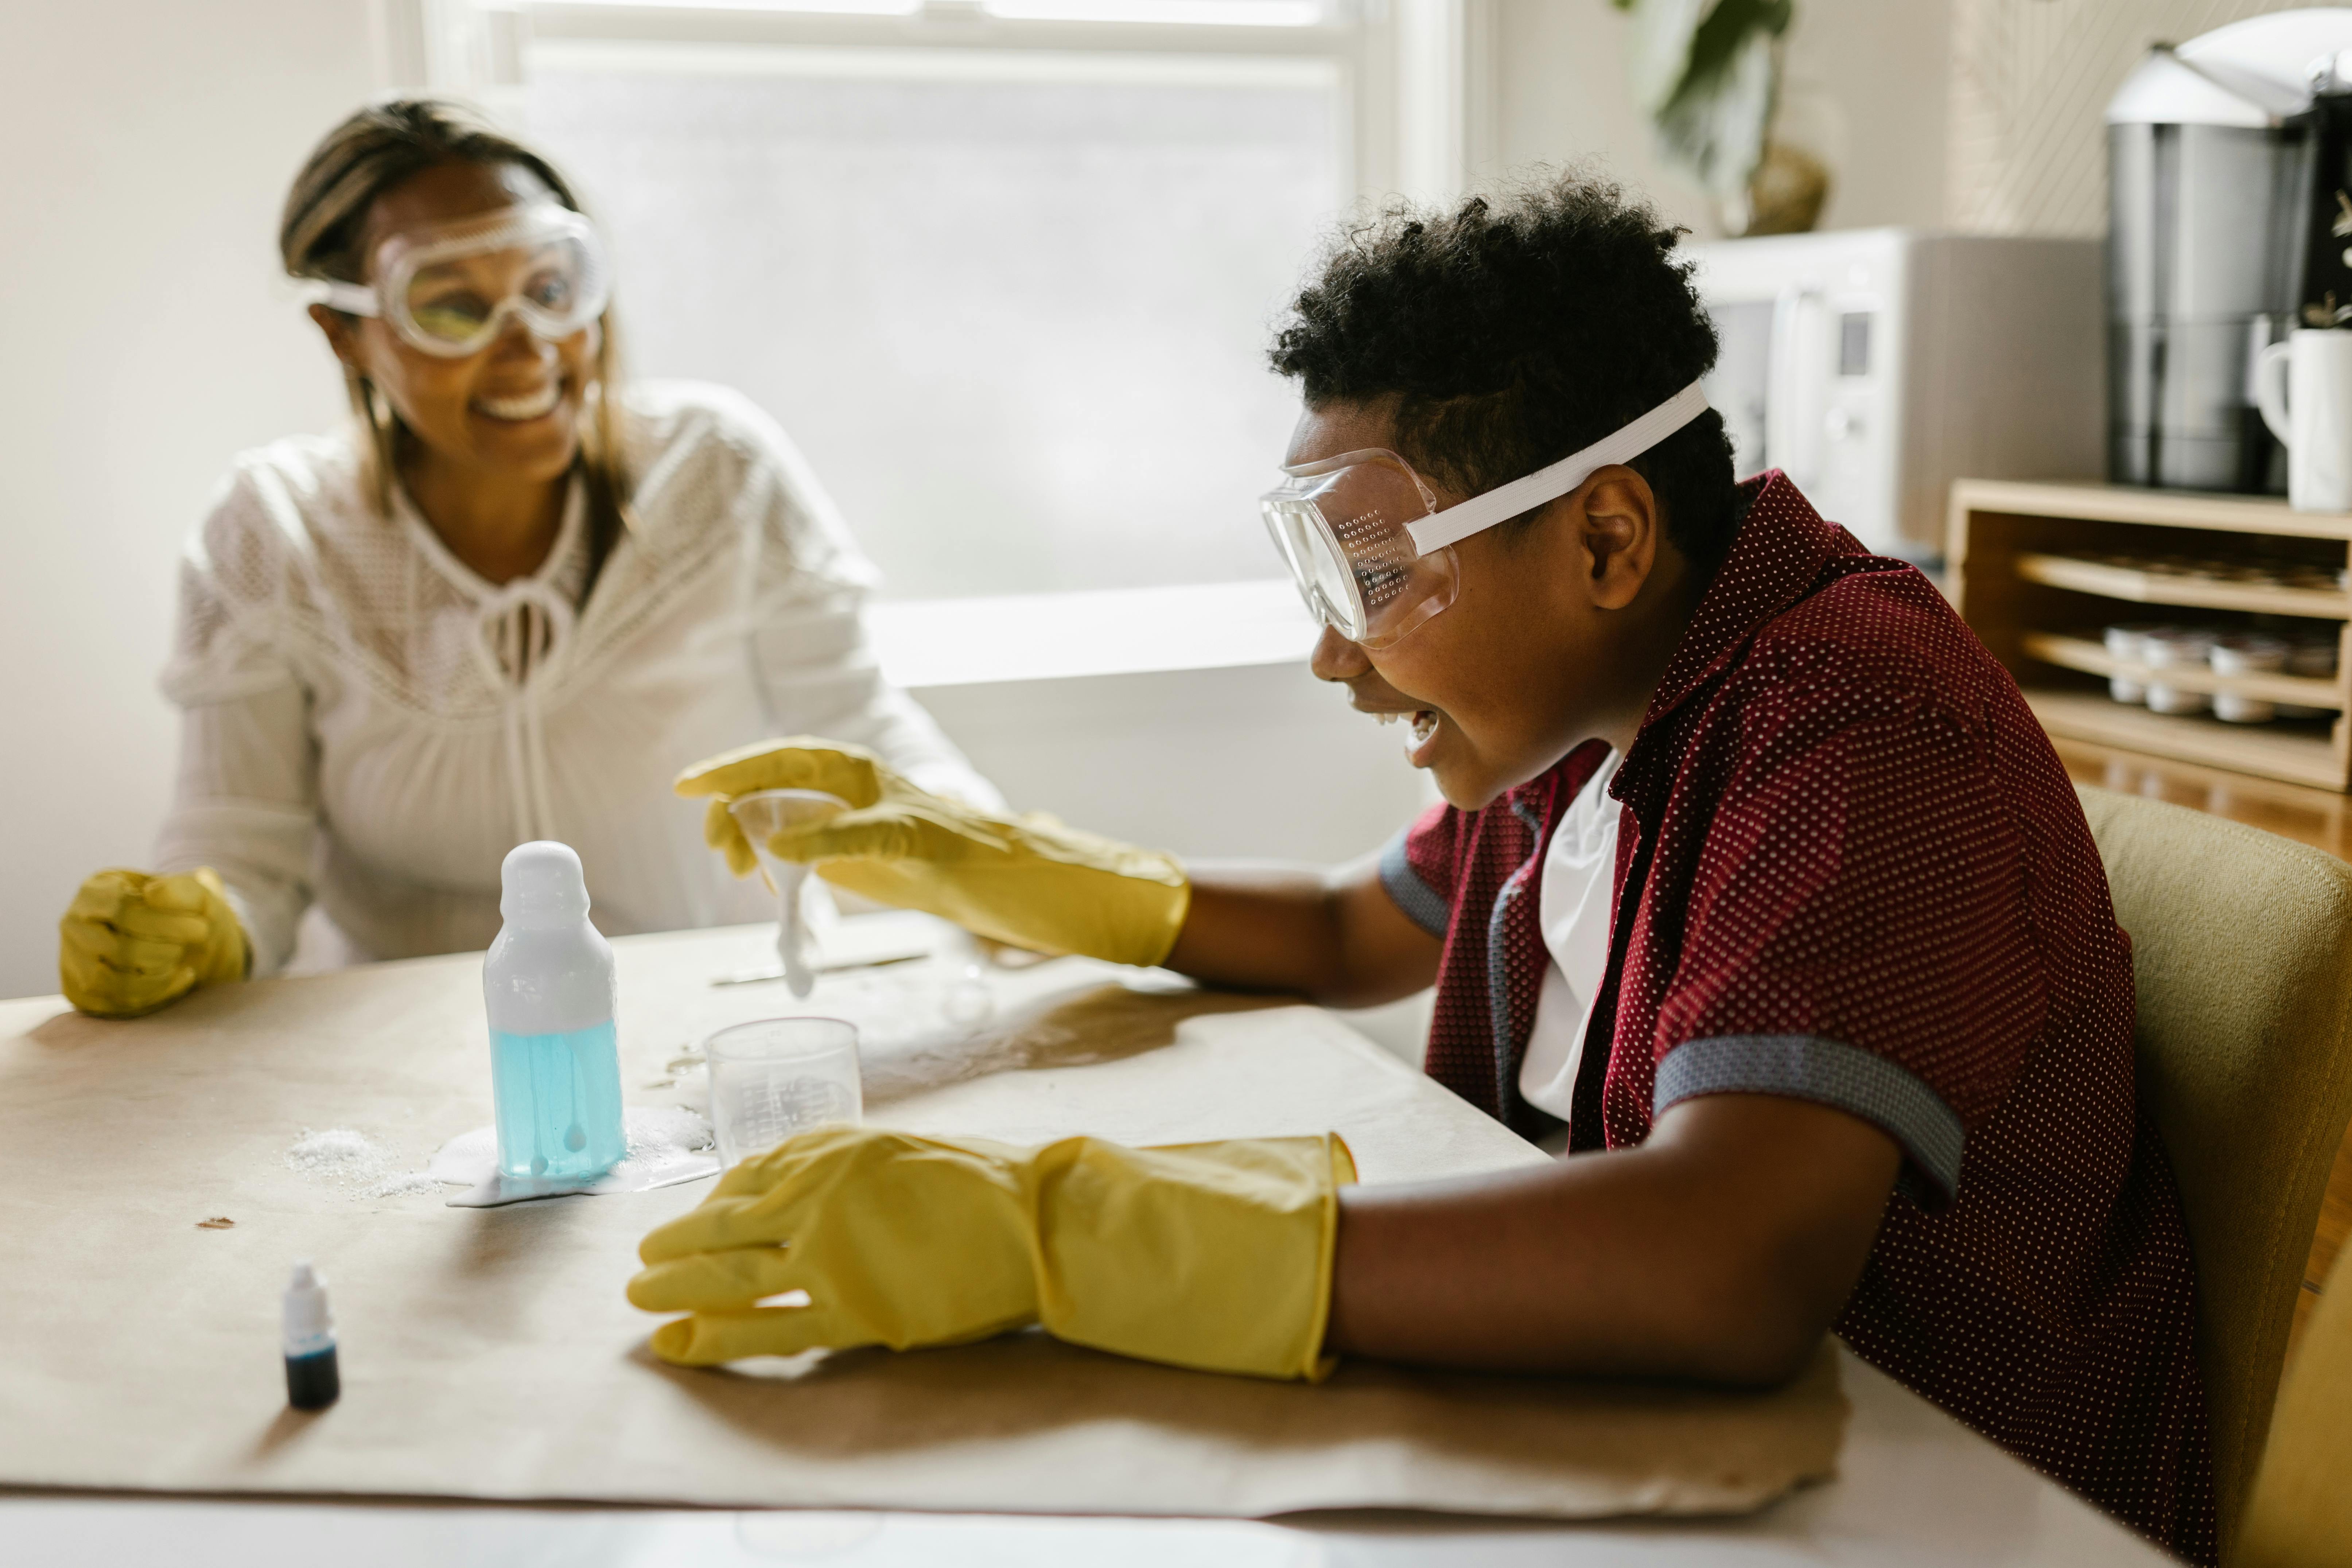
Do you remember the mesmerizing motion of a lava lamp?
With its hypnotic, colourful bubbles rising and falling? That magic doesn't have to be confined to a store-bought lamp; it's actually a fairly straightforward – and fun – chemistry experiment at home! Today, we're diving into the engaging world of DIY Lava Lamp Science Experiments.
This isn't just about creating pretty décor
It's a wonderful hands-on lesson on oil and water science that can get kids excited about learning science at home. Not only is it a cheap science experiment, but it's also a thrilling way to transform your living room into a mini laboratory. So, roll up your sleeves and get ready to make science come alive with your own homemade lava lamp.
The Science Behind Your DIY Lava Lamp
First things first, let's demystify how a lava lamp works. This isn't just a fun home experiment; it's a great opportunity for you to learn about some fascinating oil and water science. You see, oil and water do not mix – a property known as immiscibility. But why is that? Without going into complex chemical structures, it simply boils down to the fact that water molecules are strongly attracted to each other, leaving no room for the oil molecules.
This difference in densities creates the mesmerizing movements in your homemade lava lamp. When you first add the water and oil into your bottle, you'll notice the oil floats to the top due to its lighter density. However, once you add your fizzing tablet, a gas is produced, which creates bubbles or clumps in the oil. These gas bubbles exert an upward force that carries some oil along for the ride. Once the bubbles pop at the surface and the gas escapes, gravity pulls the oil back down—giving you the spellbinding, colourful flow of a DIY Lava Lamp Science Experiment!
The Fun Begins: Setting Up Your Lava Lamp Project
Now that you've had a brief lesson in oil and water science, it's time to undertake this fun and educational project at home. Making your own lava lamp involves a list of simple items you probably already have around the house:
- A clear, empty container like a plastic or glass bottle
- Tap water
- Vegetable or cooking oil
- Food coloring (any color of your choice)
- An effervescent seltzer tablet (like Alka-Seltzer)
To set up your lava lamp experiment, begin by filling a quarter of your chosen container with water. Then pour in the oil until the bottle is nearly full. Leave some room at the top to prevent spills during the experiment. You’re now ready to bring your DIY lava lamp to life!
Witness the Magic with Your DIY Lava Lamp Science Experiment
The magic of the lava lamp takes place once you drop the seltzer tablet into the oil and water mixture. After you’ve added the tablet, quickly tint the solution with your desired color by squeezing a few drops of food coloring. Just remember to stick to one color to avoid muddying the water.
You’ll notice that the coloring only tints the water and not the oil—a demonstration of the immiscibility principle we explained earlier. As the tablet dissolves, it creates gas bubbles that make their way to the surface, pulling some colored water and creating the iconic lava lamp blobs!
Throughout this chemistry experiment at home, you'll be learning science at home, with the added bonus of creating an entrancing homemade lava lamp. Remember to observe and ask questions about why certain things happen - it's all part of the educational process.
Discover Science with DIY Lava Lamp Experiment
Having walked you through the various steps to create your very own lava lamp, from understanding the science to witnessing the magic unfold right before your eyes, we hope that you're all fired up to indulge your inner scientist.
This experiment, while loads of fun, also paints a vivid picture of how diverse and enthralling the world of science can be! It gives kids (and adults, too!) an active role in a real-time science experiment, sparking curiosity and encouraging questions.
Explore, Learn and Enjoy!
So, whether you're conducting this experiment on a lazy weekend afternoon or amid the hustle and bustle of a weekday evening, remember—the magic of learning doesn’t always come from a textbook. Sometimes, it’s hidden in a DIY lava lamp science experiment, waiting for you to explore.
You May Also Like These:
Space-Time Calendar STEM Project
Create a fun and educational calendar commemorating important scientific events with your child! This project teaches a multitude of skills, including research skills, basic knowledge in history of scientific discoveries, and creativity.
Ingredients
- Large white poster board (A1 Size)
- Colorful markers or paint in various colors
- Ruler or straight-edge
- Scissors
- Glue
- Printed pictures of famous scientists or their discoveries (optional)
- Stickers (optional)
Instructions
1. Schedule a Brainstorming Session
Find a quiet and cozy spot for a brainstorming session with your child. Make a list of their favorite scientific events, discoveries, or scientists. Aim to list at least 12 - one for each month of the year.
2. Research Key Dates
Look up online or in a science encyclopedia the important dates for each event or discovery that you chose in your brainstorming session. Write down these dates as they will be your monthly entries into your calendar.
3. Draw Your Calendar
Using the ruler, draw a grid of 12 squares (3 rows and 4 columns) on the poster board. Make sure the squares are large enough to write the month, the date of the significant event, and a description or picture of the event.
4. Illustrate Your Calendar
Now comes the fun part. Let your child paint or color each box, write the name of the month, the key date and a brief description of the discovery or event. They can also glue a picture or a drawing that represents the event and make it as colorful and creative as they would like.
5. Review and Hang
Once done, review the calendar together. This is a great time to reinforce what they learned. Then find the perfect spot to hang your calendar, where it can serve not only as a daily reminder of the date, but as a learning tool throughout the year.
Enjoy this fun and educational STEM project that not only imparts knowledge, but creates lasting memories.
STEM Project: Building a Bridge from Spaghetti
Ingredients:
- Uncooked Spaghetti - 1 Packet
- Marshmallows - 1 Packet
- Tape Measure or Ruler
- Camera (Optional)
Instructions:
- Gather all materials: Clear your workspace and gather all your ingredients.
- Draw a blueprint: Have a clear idea of how you want your bridge to look like. Draw a simple blueprint on paper.
- Start building: Use marshmallows as connectors and spaghetti as beams to construct your bridge based on the blueprint.
- Measurement: Use the tape measure or ruler to ensure that your bridge is symmetrical.
- Photography: (Optional) Document the process with a camera. This can make a great visual aid for explaining your project.
- Test your bridge: Place weight on your bridge gradually until it breaks. Record the maximum weight it could hold. You can use this data for further mathematical analysis.
STEM Project: Fibonacci Sequence in Nature
Ingredients:
- Camera
- Notebook
- Pen/Pencil
Instructions:
- Research Fibonacci sequence: Understand what a Fibonacci sequence is and how to recognize it.
- Start observing: Go outside and start looking for examples of Fibonacci sequence in nature (e.g. petal counts, pinecones, etc.)
- Document: Using your camera, take photographs of your findings and record them in your notebook. Note down how the Fibonacci sequence was found in your examples.
- Analysis: Do a statistical analysis of your data. Try to find trends, relationships, or other interesting features.
STEM Projects for Engineering and Mathematics
Project 1: Bridge Building
Ingredients:
- 100 Popsicle sticks
- Non-toxic glue
- String
- Weights (to test the strength of the bridge)
Instructions:
- Start by laying out two parallel lines of popsicle sticks
- Connect them by gluing additional sticks crossing them horizontally
- Allow the glue to dry before proceeding
- Construct the sides of the bridge by creating triangles for engineering strength
- Attach the sides to the base with glue and let dry
- Test your bridge's strength by gently adding weight
Project 2: Mathematical Puzzle Solving
Ingredients:
- Pencil
- Eraser
- A Sudoku or a Rubik's Cube
Instructions:
- Start with the easiest levels and gradually challenge yourself moving to more difficult tasks
- For Sudoku, fill the grid such that every row, every column, and every 3x3 square contains the digits from 1 to 9
- For Rubik's cube, turn the faces of the cube to get a single color on each face.
- Take breaks if needed, this improves cognitive skills and problem-solving abilities
DIY Hydroponics and Indoor Garden
Celebrate April 8th by enhancing your STEM knowledge and research skills with this engaging Hydroponics project. This project will help you understand the science behind plant growth and greenhouse technologies. Follow the instructions below to start your Indoor Hydroponics Garden.
Materials Needed
- Plastic container with a lid (ideally opaque to prevent algae growth)
- Cotton wool or rockwool
- Hydroponic nutrients
- Water
- A small air pump (like an aquarium pump) with an air stone for oxygenation (optional)
- Seeds of your choice
Instructions
- Prepare Your Container: Drill or cut small holes in your container's lid. The holes should be large enough to insert your cotton wool or rockwool cubes. If using an air pump, drill an additional hole for your air stone tube.
- Placement of Cotton/Rockwool: Insert your cotton wool or rockwool cubes into the holes you’ve made, ensuring they are secure.
- Seed Planting: Plant your seeds in the cotton wool or rockwool.
- Mixing the Nutrient Solution: Following the instructions on your hydroponic nutrient package, mix the nutrient solution with water. The depth of this solution should not drown your rockwool or cotton wool; it should stay moist but not oversaturated.
- Setting the Air Pump: If using an air pump, place the air stone in your nutrient solution to oxygenate the water.
- Watch Your Garden Grow: Place your container under a light source and monitor the growth of your plants. Make sure to replenish the nutrient solution when needed, and ensure the cotton wool or rockwool stays moist.
Note: Always remember, Hydroponics is a trial and error process. Keep experimenting and discovering new methods and strategies to enhance plant growth!
Your Brilliant STEM Project 2025
Get ready to embark on a fun and informative STEM project! These step-by-step instructions will have you and your child exploring the world of science, technology, engineering, and mathematics in no time. Let's get started.
Ingredients
- Science: Magnifying glass, various outdoor samples (leaves, rocks, etc.)
- Technology: Computer with internet access
- Engineering: Assorted LEGO bricks or other building blocks
- Mathematics: Ruler, protractor, compass
Instructions
Follow the steps below to complete your project:
Step 1: Explore Science
Using your magnifying glass, examine the outdoor samples collected. Discuss with your child what they observe through the magnifying glass that they could not see with the naked eye.
Step 2: Engage with Technology
Access the internet on your computer and research further about the samples collected. For example, learn about the type of rock or leaf, its origin, usage, etc. If possible, document the research for future reference.
Step 3: Experiment Engineering
Using the LEGO bricks or any building blocks available, encourage your child to construct a model related to what is learned in the previous steps. For example, a tree for a leaf or a mountain for a rock.
Step 4: Master Mathematics
Measure the model made by using a ruler, protractor, or compass. Discuss the different measurement units, shapes, and angles involved.
Remember that it's all about learning and having fun! Don't worry about getting all steps perfect. Instead, focus on the opportunity to explore STEM concepts together.


