


As an affiliate, I earn from qualifying purchases, but this doesn't affect the reviews or recommendations—your trust is important to me!
Craft Your Own DIY Handmade Soap Crafting Kit Guide

Today, We're Making:
- - DIY Handmade Soap Crafting Kit
- - DIY Soap Aliens and Galaxy Project: Making use of the DIY Handmade Soap Crafting Kit, help kids to create fun alien and galaxy inspired soaps. They can get creative with their alien designs using different colors and shapes, while the galaxy theme can be achieved with swirled colors and glitter.
- - 'Time Capsule' Memory Soap: Encourage kids to make soaps with tiny, waterproof trinkets inside that remind them of this specific date (06-15-2025). It could be a small printed paper with the date, pictures.
Finding the Right Soap: A DIY Guide
Finding the right soap that suits your skin and smells just the way you like can often feel like an uphill battle and store-bought options can sometimes underdeliver. But what if you're handed the control to shape that experience your way?
Buckle up because, with this DIY Handmade Soap Crafting Kit guide, you'll take the reins. Home craft ideas have never been this exciting!
Now, you could blend natural ingredients for your soap, customize its scent, texture, and color, all while ditching harmful chemicals found in commercial soaps. Whether you're a beginner to soap making or an enthusiast seeking for new tricks, this soap making step-by-step tutorial will turn you into a soap crafting whiz, creating your soap artistry masterpieces.
Unbox Your DIY Handmade Soap Crafting Kit
Before we delve into the soap-making process, let's familiarize ourselves with what's inside our DIY Handmade Soap Crafting Kit. Typically, a kit contains a soap base, various essential oils, color pigments, molds, and sometimes, decorative additives like dried flowers or glitter. The soap base, which usually comes in a sizable block, is typically an unscented, clear or white melt-and-pour glycerin soap. Essential oils and pigments allow for personalized scents and colors, catering to your creative whims. Remember, each soap crafting kit is unique in its contents and allows for custom-made natural soap making. So, do not limit yourself and feel free to experiment for the best results!
Turn Your Kitchen Into a Soap Making Lab
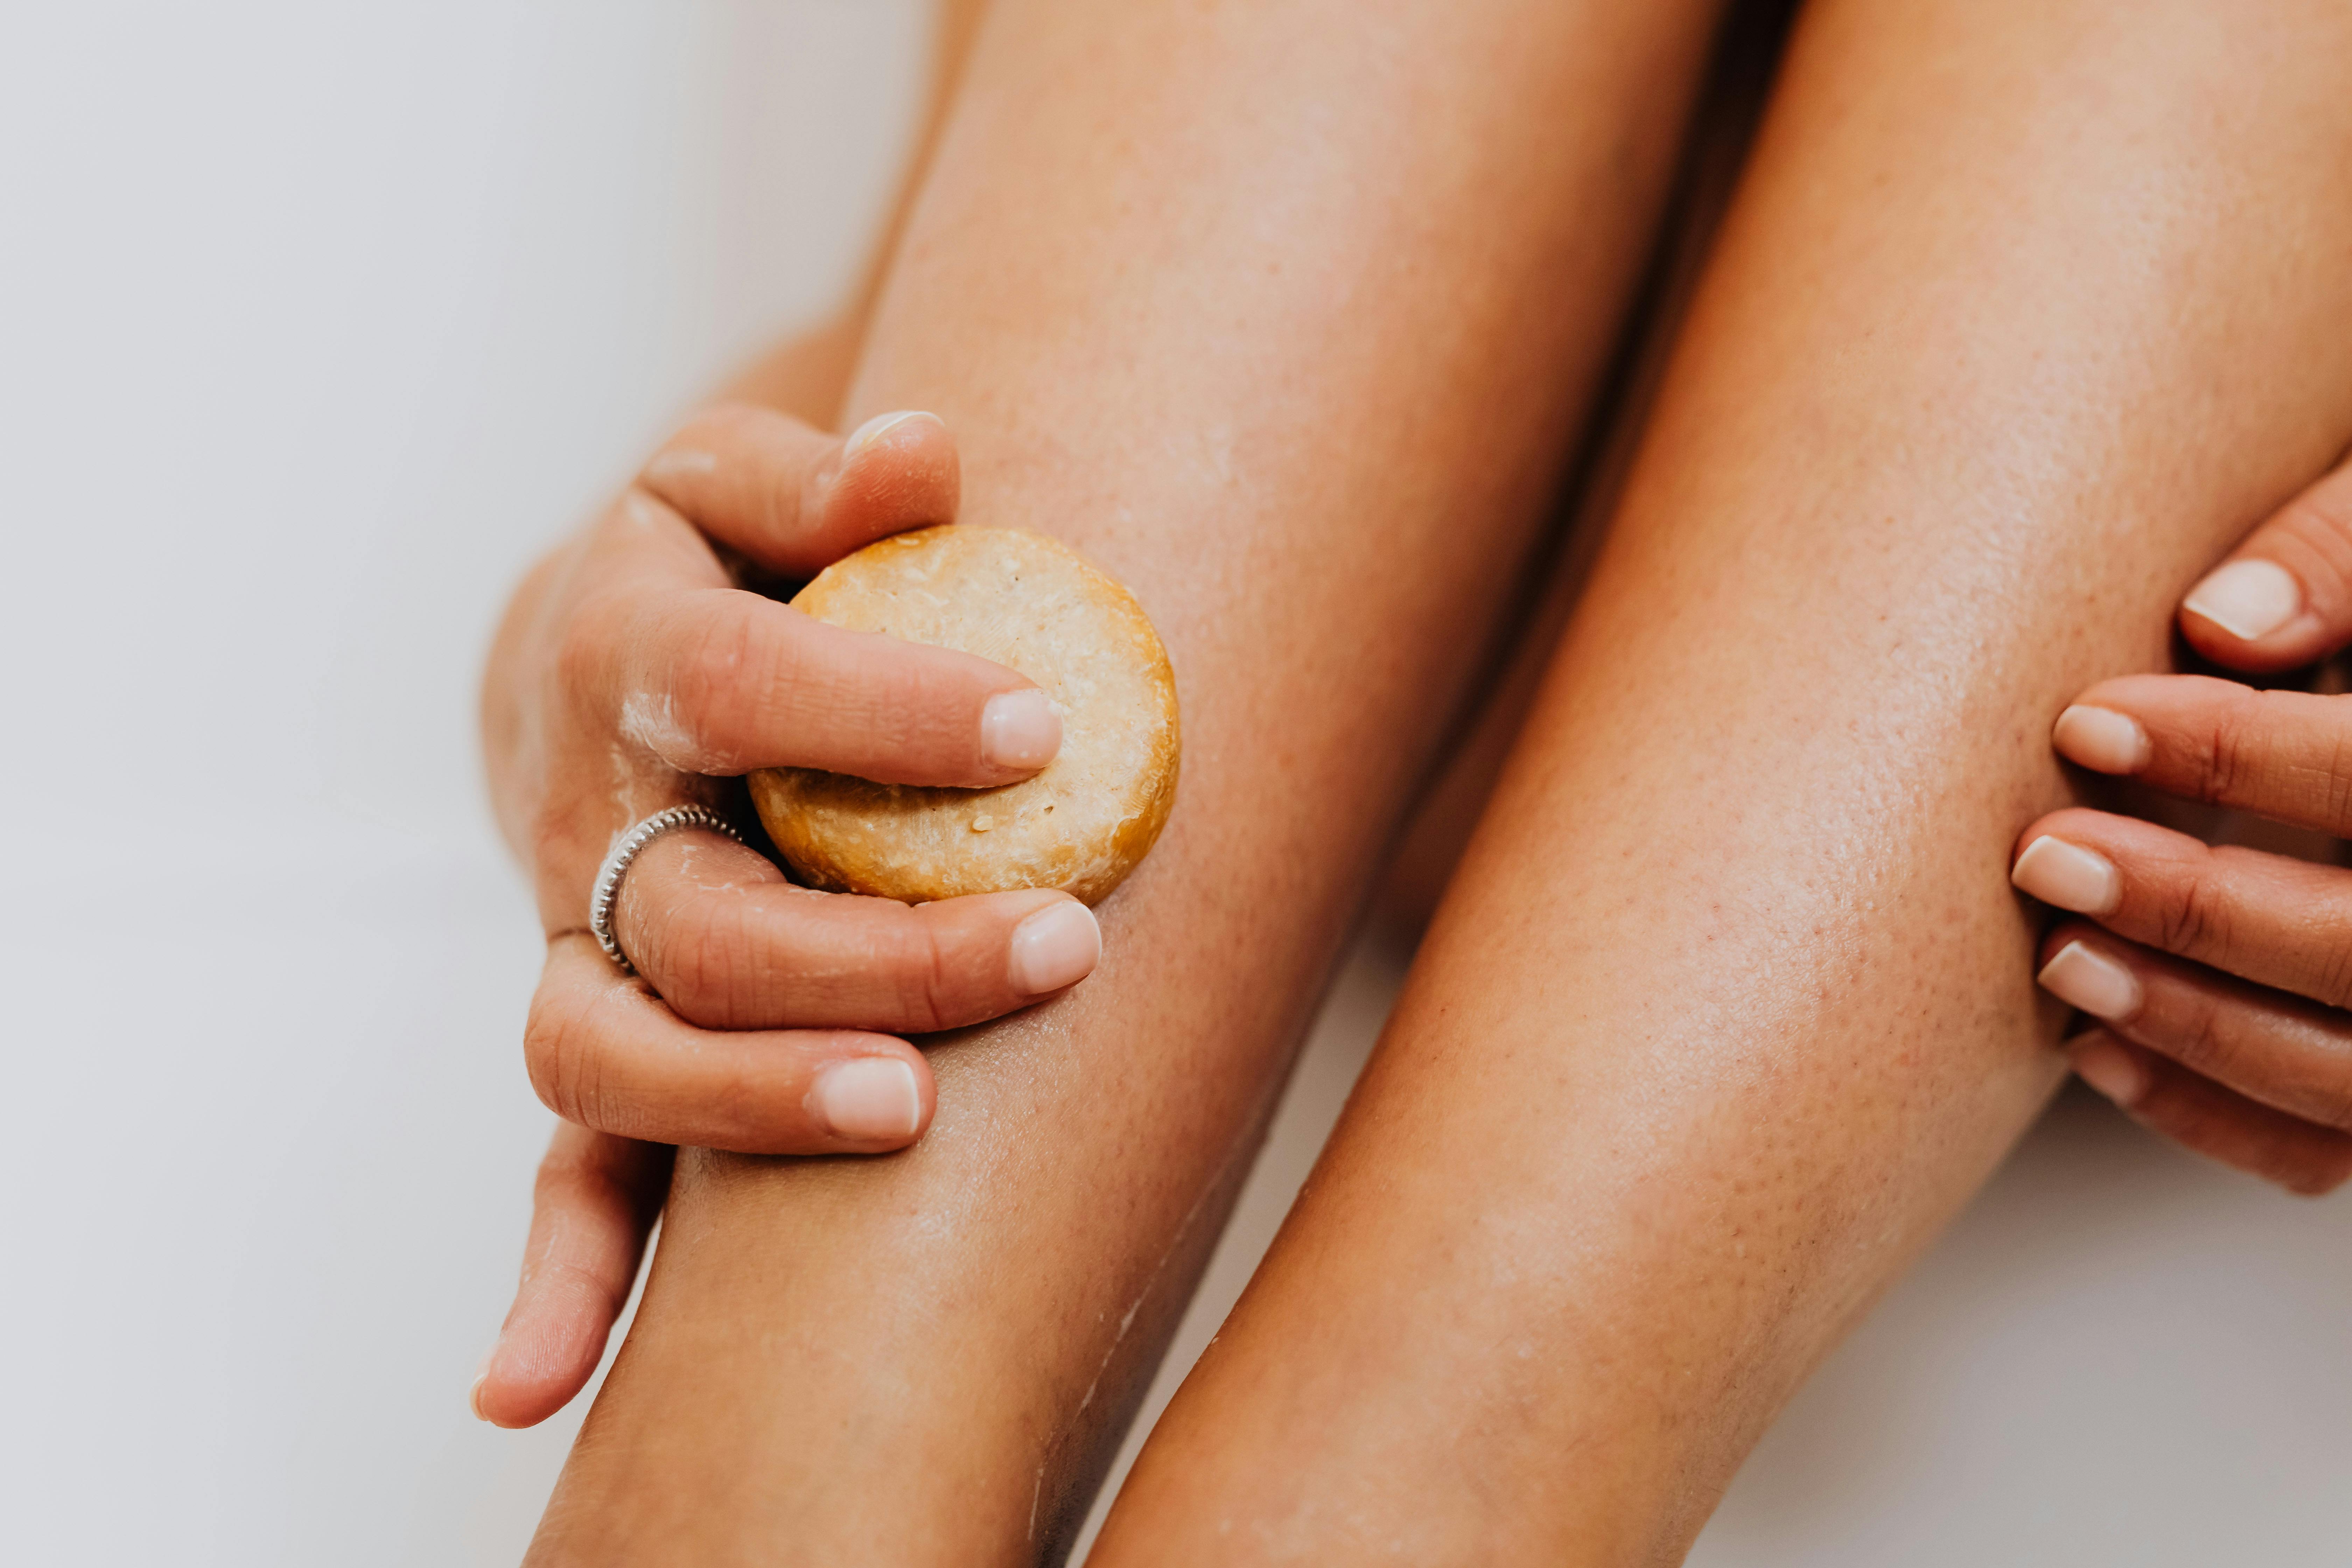
Now, let's get into the nitty-gritty of the soap making process. You might want to slip into an apron and wield your creative toolset (that's everything your soap crafting kit contains). Start by cutting the soap base into chunks - hot tip for soap making beginners, small pieces melt more evenly. With your soap base in a heat-safe container, slowly melt it over a double boiler. As a DIY soap recipe rule, maintain a low and slow heat to prevent it from heating too fast and becoming unmanageable.
Put your Safety Goggles On!Next, you'll blend your natural ingredients for soap. Once your soap base is fully melted, it's time to add your essential oils, color pigments, and any additives. Start with a few drops of essential oil; the strength of the soap's scent depends on this. Make sure you blend it evenly throughout the melted base. Then, stir in your chosen color pigment, but be careful not to go too heavy-handed – it's better to build the color intensity slowly.
The Art of Wax-Paper Lined Molds
Let's move on to the soap mold stage. One of the best handmade soap tips I can give is wax-paper lining your molds. This ensures easy release of the soap once it hardens and keeps the patterns on your soaps intact. Pour your soap mixture into the wax-paper lined molds and gently tap to release any bubbles. Leave the soap to cool and harden, either at room temperature or in the fridge if you're in a hurry. Once hardened, your delightful creations are ready to be unmolded and enjoyed!
Embark on a Soap Crafting Adventure
With your crafting soap kit at hand and this soap making step-by-step guide under your belt, your soap crafting adventure is only beginning. Remember, this process doesn't end in the molds. The beauty of this DIY craft is its experimental nature and endless possibilities. Be it personalized scents, color blends, or even soap shapes, the artistic liberties are all yours to take. As you delve further into soap making, you'll find yourself immersed in the world of soap artistry, developing your styles, customized treatments, and even storage techniques!
Parting Tip!And remember, your skin might not instantly purr at the first go. Be patient with yourself and the process. Educate yourself on different natural ingredients for soap – what suits you and what doesn't. Mastering organic soap making is a journey, not a destination. Enjoy the ride!
This versatile DIY handmade soap crafting kit can revolutionize your bath time while doubling as handmade gifts for friends and family. Additionally, it's a gateway to explore the vast universe of homemade beauty products. The pride of using a soap crafted by oneself is unparalleled. Once you start with your own soap, the next step could be lotions, bath bombs, and more. The opportunities are endless and the crafting world, welcoming. So, go forth and suds!

Your Guide to DIY Handmade Soap Crafting
And there you have it - your guide to diving into the rewarding world of DIY handmade soap crafting. You're now armed with the know-how to transform basic ingredients into personalised, skin-loving soaps, customised to your preferences.
The Freedom to Experiment
With the freedom to experiment, you can embark on an exciting journey to becoming your own soap artist, all at the comfort and convenience of your home. Not only will you revel in the joys of homemade soap making, but the thrill of gifting and sharing your crafted treasures with loved ones will be truly exceptional.
The Benefits
Remember, the soap crafting adventure is as fun as it is beneficial for your skin. So, why wait? Embrace the excitement of DIY, bask in the gentle suds of your soap creation, and say hello to your new wonderfully fragrant and mindful lifestyle today.
Are You Ready?
Now, aren't you ready to get your hands soapy?
You May Also Like These:
DIY Soap Aliens and Galaxy Project: Utilizing DIY Handmade Soap Crafting Kit
Ingredients:- Soap Base
- Soap Colorants
- Soap Molds (Alien and Galaxy shaped)
- Glitter Powder
- Essential Oils (of your choice)
- Microwave-safe Bowl
- Spoon for stirring
- Prepare your workspace: Before starting, ensure that your workspace is clean and you have all your supplies close. Have your soap base, colorants, glitter powder, essential oils, and molds ready.
- Melt the soap base: Cut the soap base into small pieces and place them in a microwave-safe bowl. Heat the soap base in the microwave in 15-20 second intervals, stirring in-between, to avoid overheating. Continue this process until the soap base is fully melted.
- Add Colorants and glitter powder: Once the soap base has melted, carefully add your selected soap colorants. For an authentic galaxy look, consider using purple, blue, and black colorants. Stir gently until the colorant is fully mixed. Sprinkle some glitter into the mixture for the starry effect.
- Add the Essential Oils: Add a few drops of your selected essential oils into the soap mixture. Stir gently to combine.
- Pour into Molds: Pour the soap mixture into your alien and galaxy shaped molds. Be careful to avoid spills or overfills.
- Let it Set: Once all the mixture is poured into the molds, allow them to cool and harden. This could take several hours or overnight. Avoid moving the molds while the soap is setting, to keep the shape intact.
- Unmold and Enjoy: After the soap has hardened, gently remove them from the molds. Your DIY Soap Aliens and Galaxy are now ready to use!
'Time Capsule' Memory Soap
Ingredients:- Clear glycerin soap base
- Soap mold
- Small trinkets or waterproof figures
- Soap colorants (optional)
- Essential oils (optional)
- Chop up the clear glycerin soap base into small cubes and place them into a microwave safe bowl.
- Heat the soap base in the microwave in 30-second intervals until it's completely melted, stirring after each interval.
- Add a few drops of soap colorants and essential oils to the melted soap base if desired, and stir well.
- Place your chosen trinkets or waterproof figures into the soap molds.
- Pour the melted soap base into the soap molds. Ensure the trinket is completely covered.
- Let the soap cool and harden completely.
- Once the soap is hardened, carefully remove it from the mold.
Galaxy Craft
Materials:- Black canvas or thick black paper
- Acrylic paint (Various shades of blue, purple, and white)
- Glitter (Optional)
- Cotton balls
- Paintbrush
- Stickers or cut-outs of stars (Optional)
- Add dabs of your chosen shades of paint onto the canvas or paper.
- Using the cotton balls, blend the paints together in swirled patterns to create galaxy effects.
- While the paint is still wet, sprinkle some glitter onto the canvas if desired to add some sparkles.
- Allow the paint to dry completely.
- Stick the star stickers or cut-outs randomly onto the painted canvas or paper to complete your galaxy theme.
Galaxy Themed Arts & Crafts
Bring the magnificence of the galaxies to your home with these simple, easy-to-follow instructions.
Ingredients:
- One canvas board or heavy-duty cardstock
- A variety of acrylic paints (black, purple, blue, white, etc.)
- One sponge or paintbrush
- Silver or gold glitter
- One paint tray
Instructions:
- Start with a black base layer to get the canvas ready.
- Dip your sponge or paintbrush into different color paints & blot or swirl them randomly on the canvas.
- Feel free to use as many or as few colors as you like. The goal is for the board to look like a colorful night sky, so the placement of each color doesn’t have to be perfect.
- Sprinkle some silver or gold glitter while the paint is still wet to add the sparkling stars to your galaxy.
- Let it dry fully before handling or hanging.
'Time Capsule' Memory Soap
Create a unique and personalized 'Time Capsule' Memory Soap that contains tiny treasures inside.
Ingredients:
- Clear glycerin soap bars
- Soap mold
- Small trinkets/toys/charms (make sure they are water resistant)
- Essential oils (optional)
Instructions:
- Cut the glycerin soap bar into cubes and melt them in a double boiler or microwave.
- If using a microwave, heat the soap in 30-second intervals, stirring in between until it’s fully melted.
- Add a few drops of your chosen essential oil to the melted soap and stir gently to mix.
- Setting your chosen trinket/toy/charm in the soap mold.
- Carefully pour the melted soap into the mold, making sure to cover the trinket completely.
- Allow the soap to cool and harden completely before removing from the mold.
Waterproof Trinkets Keepsake Crafting Instructions
Ingredients:
- A small trinket box (preferably waterproof)
- High-quality printing paper
- Printer
- Polyurethane or any other waterproof-sealer
- Brush
Instructions:
- Step 1: On your computer, open the document you want to print. Set the date to 06-15-2025.
- Step 2: Set your printer to the highest-quality print setting. Ensure that your paper is inserted correctly.
- Step 3: Print the document. Let it dry for about 10 minutes.
- Step 4: Apply a thin layer of polyurethane or your waterproof-sealer with your brush over the printed date. Make sure all parts are covered. Let it dry for 1-2 hours or till it's completely dry.
- Step 5: After it's fully dried, fold or cut, if necessary, the paper with date so it fits in the trinket box.
- Step 6: Place the waterproofed date in the trinket box. Now you have a small keepsake to remind you of the special date.
DIY Picture Frame Craft
Ingredients:
- 4 Popsicle Sticks
- Glue
- Decorative Items (stickers, glitter, paint, etc.)
- Photo (sized to fit within the popsicle stick frame)
Instructions:
- Lay out Your Materials: Place all your ingredients on a flat, clean surface. Ensure the photo you choose fits within the popsicle sticks when arranged in a square or rectangle.
- Design Your Frame: Before gluing, arrange your popsicle sticks in the shape of a square or rectangle. Decorate your popsicle sticks with your choice of stickers, glitter, paint, etc.
- Construct Your Frame: Using your glue, connect the ends of your popsicle sticks to form a square or rectangle. Allow the glue to dry completely before moving to the next step.
- Attach Your Photo: Once the frame is completely dry, apply a small amount of glue to the back of your photo. Center and stick your photo to the back of the popsicle frame. Allow to dry thoroughly.