


As an affiliate, I earn from qualifying purchases, but this doesn't affect the reviews or recommendations—your trust is important to me!
Creating Hot Air Balloon Salt Painting Craft at Home

Today, We're Making:
- - Hot Air Balloon Salt Painting Craft
- - DIY Time Capsule: Since it's 2025, start off by creating a time capsule. Include things like a handwritten letter about current events or personal experiences, photographs, favorite toy or book, etc. The time capsule can then be stored away to be opened in a future year.
Welcome to the Wonderful World of Hot Air Balloon Salt Painting Craft
Remember the first time you witnessed the awe-striking sight of hot air balloons painting the sky with hues of vibrant colors? The excitement, the marvel, the raw curiosity; it was akin to a live, beautiful piece of art. Now, imagine bringing that memory to life, at home, in a crafty, creative way.
Welcome to the wonderful world of hot air balloon salt painting craft, one of the unique craft ideas that don the interweb! This is not just about creating a stunning homemade hot air balloon, it's also a fantastic way to enjoy some quality family crafts time and master some salt painting techniques.
Who is this for?
Whether you’re a DIY crafts enthusiast wanting to add something special to your collection, or a parent looking for kid-friendly crafts, or even an educator seeking an engaging education craft – this tutorial has you covered.
It's time to roll up those sleeves and let your balloon of creativity take flight!
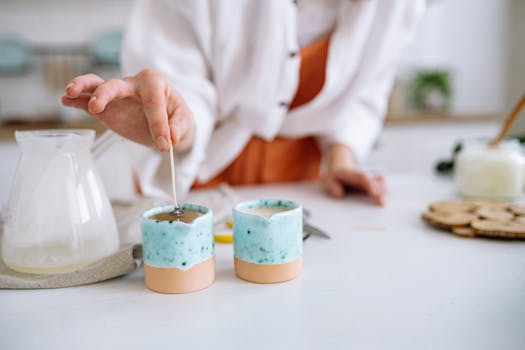
Creating Your Hot Air Balloon Salt Painting Craft
The first step in our flight to creativity with our Hot Air Balloon Salt Painting Craft involves getting our materials ready. Round up some regular household items like glue, salt, watercolor paints, cardstock paper, and a paintbrush, these will form the primary arsenal for our crafty creation. Now, let's release the artist within you and create our homemade hot air balloon. Draw an outline of a hot air balloon on the cardstock. Add some aesthetic stripes, checks, or even polka dots within the outline, to give your balloon a little more panache.
The Downpour of Salt and Color
Next, comes the part where we integrate the literal ‘salt’ into our Salt Painting project. Trace over your hot air balloon design with glue. Now, it's time to rain down some salt onto the glue. Ensure you cover the glue completely as this integral step aids in creating the unique textural effect in our DIY salt painting which will become the star of your art and craft collection. Once the salt settles, tap off any excess and let the salt-glue mix dry. How is your hot air balloon looking now? It's exciting, isn't it?
Adding the Vibrant Hues
No hot air balloon can do without its vibrant palette of colors, right? This next phase is where things get even more fun. Use different paints to apply color to your salt-coated glue lines. Thing lean vertical lines of blues, purples, reds, and yellows, watch in marvel as each pigment spreads, bleeds, and blends at the mere touch of your brush. The salt creates magical effects that kids and adults alike will find enchanting.
Learning While Crafting
This isn't just a fun craft activity, dear reader, it's also an excellent education craft for your little ones. This Hot Air Balloon Salt Painting Craft is a fun, interactive way to teach kids about the blending and absorption of colors. It also enhances their motor skills and sparks their creativity. Yes, they're not just making a beautiful homemade hot air balloon, but also learning key craft skills and scientific concepts. Who knew that such a simple, easy craft could be so instructive?
Sharing the Love of Crafting
One of the greatest joys of DIY home crafts projects like this one is to share the fun! Whether you're co-creating with your children or sharing this wonderful hot air balloon DIY craft with your friends or teaching the technique in your art class, each experience is unique and incredibly rewarding. After all, joy doubles when it's shared, right?
The Sense of Accomplishment
As the final dot of paint seeps into the salt, an overwhelming sense of accomplishment engulfs you. Your craft project is now a beautiful piece of art. This creative craft isn't merely about making hot air balloon salt painting; it's about cherishing the entire process. Each color, each grain of salt, each stroke uniquely contributes to the masterpiece you've created. Even more so when your family partakes in this fun adventure of DIY crafts, it becomes a treasured memory, a cherished family craft time. Your masterpiece is now not just a piece of art; it's a capsule of love, creativity, and togetherness.
Goodbye to a Creative Journey
So, as we bid adieu to this creative journey, it's delightful to think about the memories created while crafting your hot air balloon salt painting. It's not just a painting, it's a symbol of creativity, learning, and shared joy. It's your personal masterpiece, carrying pieces of a beautiful day spent engrossed in an amalgamation of colors and laughter with loved ones.
More Than Just a Craft
Without any doubt, hot air balloon salt painting is not just a craft; it's an experience, a journey, a beautiful ride that you embarked upon, and now it's there - vivid and vibrant - to remind you of that wonderful voyage whenever your eyes meet it.
Keep Your Creativity Soaring
So, until next time, keep your spirit of creativity soaring high and let your colors fill the canvas of life with joy and beauty.

You May Also Like These:
DIY Time Capsule Craft
Ingredients
- A sturdy box or container
- Items to put in the time capsule (photos, letters, toys, etc.)
- Permanent Marker
- Sealing tape
- A safe place to keep it
Instructions
- Choose a container: Find a sturdy box or container. Something airtight and durable like a plastic Tupperware container would be best.
- Select Items: Gather items to place in your time capsule. These should be things that represent your current life. Photos, notes, small keepsakes, a newspaper clipping, popular toy, or even a USB drive with digital files.
- Write a letter: Write a note for future self or future generations. You might want to include some interesting facts about current life in 2025 for a fun touch!
- Seal It: Once all items have been placed inside, seal the container with tape to protect against any potential damage or wear over time.
- Mark the date: Write today's date and a future opening date on the container. It's always fun to guess what life will be like when the time capsule is eventually opened.
- Find a Safe Place: Decide where you will keep your time capsule. You could bury it in your backyard or hide it in a closet. Wherever you put it, make sure it’s a place that won’t be disturbed for many years.
DIY Photo Magnet Craft
Honoring your precious moments by displaying them is wonderful, and it doesn't need to be expensive or complicated. Our simple guide will help you create personalized DIY photo magnet crafts that are perfect to hold onto for yourself or give as a gift.
Materials Needed:
- Clear glass gems - You can find these at your local craft or dollar store.
- Photos - Either print them at home or by a photo printing service.
- Magnet Buttons - Ensure that the size fits the back of your glass gems.
- Mod Podge - This will be used as a glue and varnish.
- Paintbrush - To apply the Mod Podge.
- Scissors - To cut your photos to the appropriate size.
Instructions:
- Prepare your photographs: Start by selecting and printing your favorite photos. Remember that they should be sufficiently small to fit on the back of your clear glass gem.
- Cut the Photos: Cut your photographs to match the size of your glass gems.
- Apply Mod Podge: Use your paintbrush to apply a layer of Mod Podge to the flat side of the glass gem.
- Position the Photo: Place the photo face-down onto the Mod Podge coated gem. Make sure it is well-aligned and press down firmly to remove any air bubbles.
- Seal your Photo: Apply another layer of Mod Podge over the back of the photograph. This will act as a sealant. Leave it to dry.
- Attach the Magnet: Once your Mod Podge is dry, stick your magnet button onto the back of the gem.
Your DIY photo magnet is complete and ready to hold up those important reminders or just add personal touch to your refrigerator decor!
Children's Craft: Picture Collage
Materials needed:
- Family Photographs
- Construction Paper
- Scissors
- Glue
- Paper Clips (optional)
- Colorful Markers (optional)
- Stickers (optional)
- Ribbon (optional)
Detailed Instructions:
- Gather all materials: Start by collecting all the materials you will need. This is a good time to make sure you have all the photographs you want to use as well.
- Prepare the photographs: If necessary, trim the photographs to fit your construction paper. Be careful not to cut off any important parts of the photos.
- Arrange the photos: Lay out the photos on your construction paper. Play around with the arrangement until you're happy with how it looks.
- Glue the photos: Using your glue, carefully stick each photo to the construction paper. It's a good idea to start with the photos in the middle and work your way out.
- Add embellishments: If you are using paper clips, markers, stickers or ribbons, now is the time to add them.
- Let it dry: After you're done adding all your photos and embellishments, let your picture collage dry thoroughly. Drying times will vary depending on the type of glue you are using.
- Hang or gift your collage: Once completely dry, you can hang your new picture collage on the wall or gift it to a loved one.
Diy Craft: Customizing Your Child's Favorite Toy
Ingredients:
- Acrylic paints (various colors)
- Paintbrushes (various sizes)
- Clear sealant spray
- Washable marker
- Clean, soft cloth for cleaning
Instructions:
- Clean the toy: Start by cleaning your child's favorite toy. Wipe it with the soft cloth to remove any dirt or dust. Make sure it is completely dry before proceeding.
- Design: Use the washable marker to make a rough sketch of the design pattern on the toy
- Paint: Commence painting the design pattern on the toy using the various acrylic paints. Encourage your child to participate for added fun.
- Dry: Set aside the toy to dry completely. This could take a couple of hours.
- Seal: Once the paint is completely dry, spray the toy with the clear sealant. This will keep the paint from chipping or peeling off.
- Dry Again: Wait for the sealant to dry completely before your child starts to play with the toy.
Note: Supervise your child during the painting process to ensure they don't consume any paint.
Time Capsule crafts for Kids: Step-by-step Parental Guide
Materials Needed:
- Durable Container: This could be an old shoebox or a plastic container with a lid
- Paper and Pens: for creating notes and drawings
- Personal Trinkets: Toys, items, clothing, photos that represent the current time
- Tape: To secure the box closed
Instructions:
- Pick a Durable Container: This will house all your precious mementoes, so make sure it's sturdy. You can decorate it if you'd like!
- Write a Letter: Each family member could write a letter to their future selves, talking about their hopes, dreams, or even predictions for the future. These personal notes add warmth to the capsule.
- Add Personal Trinkets: Fill the box with items that represent your current life. These could be photos, toys, newspaper clippings, or any other mementoes you feel are worth preserving.
- Seal the capsule: Clearly label the date on the outside of your capsule and then close and secure it with tape. Make sure it's sealed well so no moisture can get in.
- Store it away: Find a secure and dry spot in your home where the capsule can stay undisturbed. Set a reminder on your phone or write it on your calendar for the date you've chosen to open your time capsule.


