


As an affiliate, I earn from qualifying purchases, but this doesn't affect the reviews or recommendations—your trust is important to me!
Step by Step Guide to Creating a Heart-shaped Dreamcatcher

Today, We're Making:
- - Creating a DIY Heart-shaped Dreamcatcher Craft
- - 1. Time Capsule Project - Ask the kids to gather items reflecting what they love now such as favorite small toys, a letter to their future selves, or photos. Everything goes in a durable, sealable container to be opened five years later.
- - 2. 2025 Memory Scrapbook - Children can choose and arrange photos from throughout the year, include ticket stubs from their favorite movies or events.
DIY Heart-shaped Dreamcatcher Craft: An Artful Blend of Love and Tranquillity
Have you ever found yourself searching for a unique, sentimental gift or a beautifully crafted addition to your home decor? Well, imagine surprising your dear one with a lovingly crafted heart-shaped DIY dreamcatcher, or adorning your living space with this eye-catching creation?
Step-by-step Guide to Creating a DIY Heart-shaped Dreamcatcher
In this blog post, we'll take you on a captivating journey of creating a DIY heart-shaped dreamcatcher craft, step-by-step. Born from the keen and dexterous blend of creativity and tranquillity, this heart dreamcatcher is more than just astonishing decor — It's a talisman of love, dreams, and all things magical.
Perfect DIY Craft for Any Skill Level
Whether you're a novice crafter or a seasoned expert, our detailed dreamcatcher guide will make the process as simple as threading a needle, while making the outcome nothing short of extraordinary. So without further ado, let's dive into the world of homemade dreamcatchers and enchanting heart-shaped craft craftsmanship.
Gathering Your Dreamcatcher Materials
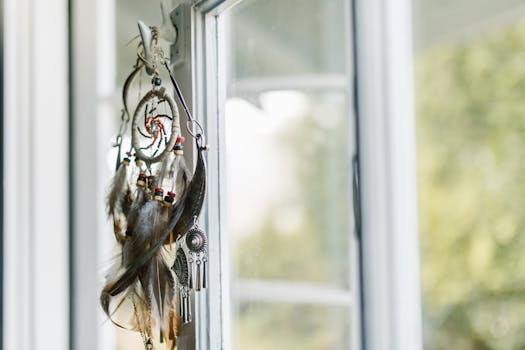
The first step in creating a DIY heart-shaped dreamcatcher craft is the preparation. Start by gathering the materials needed to make your craft project run smoothly. Venture to a craft store or check your at-home crafting supply for these essentials: a metal heart ring, suede lace, a selection of beads, and a handful of feathers. You may also want to choose additional decorative items to personalize your handmade dreamcatcher, such as fabric scraps or even small charms.
Crafting the Heart-Shaped Frame
With your dreamcatcher materials in place, it's time to begin crafting the heart-shaped frame. This frame serves as the structural backbone in your heart dreamcatcher, so you must ensure its strength. Start by taking the metal heart ring and securely wrapping it all the way with suede lace. This process transforms a simple metal ring into a soft, visually pleasing frame. No need to worry about perfecting this step, as the beauty of a DIY craft lies in its beautifully imperfect details.
Weaving the Dreamcatcher's Web
Next to crafting your heart-shaped frame comes the weaving stage, often the most exciting part of this DIY decor project. Here lies the creativity that will give your heart-shaped dreamcatcher its unique flair. Weave a web inside your heart frame using your chosen thread or string. Be patient and attentive as this is where your dreamcatcher begins to take form and embody its essence, capturing dreams and deflecting nightmares.
Decorating Your Dreamcatcher
Once your dreamcatcher's web is woven, the fun truly begins. Decorate your dreamcatcher using your selection of beads, feathers, and other personal touches. You can strategically place your beads within your dreamcatcher's web or hang them with the feathers from your suede lace. This decorative dreamcatcher step is where your creative DIY projects skills come into play. Bring your craft project to life with colors, textures, and elements that resonate with you, making this DIY heart-shaped craft not only a remarkable home decor piece but also a significant personal symbol.
Fluffy Finishing Touches
Weaving the feathers into your dreamcatcher design lends it a soft, ethereal finish, reflecting the pure motives of a genuine dreamcatcher. Thread your desired number of feathers to the end of your spare strands of suede lace, then secure these fluffy beauties at the bottom of your heart-shaped dreamcatcher craft. This step makes your dreamcatcher look complete and gives it a lovely, whimsical aesthetic.
Remember, patience is key in making a dreamcatcher. Whether it's your first experience crafting at home or you're following this dreamcatcher tutorial to add another creation to your collection, enjoy the process. By embracing each step in this DIY decor guide, you're not just creating a unique piece of home decor, you're also manifesting a token of love, dreams, and magic. Moreover, there's nothing like the satisfaction and pride of seeing your own handmade dreamcatcher adorning your space.

Your personal guide to creating a heart-shaped dreamcatcher
A portrayal of love, dreams and magic.
By embracing your creativity and patience during each step, you've created more than just a decorative piece. You have handcrafted a symbol that reflects your passion, love, and creativity. More importantly, you've awakened an artist within you.
Cherishing Your Crafted Beauty
May your new, heart-shaped dreamcatcher not only beautify your living space but also trap your sweetest dreams and keep away the nightmares. Smile at the sight of your own creation and let your heart swell with pride each time it catches your eye - because you made something beautiful with your own hands.
A Reminder...
And never forget, in creativity and craft, your heart is your best guide.

You May Also Like These:
Time Capsule Project
Ingredients:
- A sturdy container that can be sealed
- Various items selected by your child
- Paper and pens for notes or letters
- Any other items you would like to preserve as memories
Instructions:
Step 1: Gather Items
Ask your child to gather objects that reflect what they enjoy and are important to them. These could include small toys, photos, drawings, a piece of favorite clothing, or any other item that can fit into the container.
Step 2: Write Notes or Letters
Encourage your child to write a note or letter describing each item and why it's important to them. They could also write a letter to their future self.
Step 3: Assemble the Time Capsule
Place all items into the container. If you want to keep everything in good condition for a long period, consider wrapping each item in acid-free tissue paper.
Step 4: Seal and Store
Seal the container and find a suitable place to store it. This could be in the back of a closet or somewhere else in the house where it won't be disturbed. Remember the idea is to open it in future - be it five, ten, or even twenty years from now.
Step 5: Mark the Date
Write the date and a 'Do Not Open Until' date on the container. This will add more excitement for the kids when they finally get to open it.
Durable Photo Crafts for Parents
Here's a simple step-by-step guide on how to create your DIY crafts project.Ingredients
- Photos: Select your favorite photos that you wish to use for crafting.
- Adhesive: Use a durable adhesive to mount the photos.
- Scissors: A sharp pair of scissors for cutting photos if necessary.
- Cardstock or Craft Paper: This will be used as your base material for crafting.
- Embellishments: Decorative items such as sequins, ribbons, or stickers to beautify your craft.
- Sealant: A clear sealant to protect the photo and the craft.
Instructions
- Select your photos: Choose the photos you want to incorporate into your craft project.
- Prepare the Materials: Gather all the ingredients listed above within your reach.
- Design Your Craft: Arrange your photos on the cardstock or craft paper in the design you wish to achieve.
- Glue the Photos: Apply the adhesive to the back of your photos and firmly press them onto your paper.
- Add Embellishments: Decorate around the photos with your chosen embellishments.
- Apply Sealant: Apply a layer of clear sealant over your craft to protect it.
- Let it Dry: Allow the sealant to dry fully before handling or displaying your craft.
DIY Photo Frame
Materials Needed:
- A4-size Photo Frame
- Cardstock Paper
- Scissors
- Pencil
- Glue
- Photos
Instructions:
Step 1: Drawing the Frame Outline
Place the frame on the cardstock paper and trace the outline of the photo frame using a pencil.
Step 2: Cutting Out the Frame
Using the scissors, carefully cut out the frame you’ve just traced. Make sure to be cautious throughout this task as to maintain the accuracy.
Step 3: Selecting & Trimming the Photos
Select the photos you wish to be framed. Cut the photos in the correct size which is slightly smaller than frame so they can fit within the frame outline.
Step 4: Attaching the Photos
Apply a thin layer of glue on the back of the photo. Align the photo within the frame’s outline and press down to secure it into place.
Step 5: Adding the Final Touches
Once the photos are properly glued, place this sheet in the actual frame. Your customized photo frame is ready to be displayed.
2025 Memory Scrapbook Project
Ingredients:- Scrapbooking album
- Scrapbooking paper
- Photos collected throughout the year
- Adhesive, suitable for paper and photos
- Decorative items like stickers, ribbons, beads, etc.
- Scissors
- Markers or pens
- Air-tight sealable container
- Start by selecting your favorite photos from the year. These can include snapshots from family vacations, special events, or simple everyday moments.
- Cut and arrange your scrapbooking paper in your album. You can choose to align it, or get creative with different shapes and overlap.
- Next, arrange your photos on the scrapbooking paper. Try to tell a story through the photos you choose and how you arrange them.
- Once you're happy with your arrangement, adhere the photos and scrapbooking paper to the album with your chosen adhesive.
- Now it's time to decorate your scrapbook. Use your stickers, ribbons, beads, etc. to accentuate your photos and add personal touches.
- Once your scrapbook is complete, seal it in the airtight container. Make sure the container is completely closed and secure.
- Choose a memorable spot to keep your time capsule, jot down a note with the location and a reminder to open it in 2025.
Enjoy this crafting time with your children and the opportunity to curate and preserve cherished memories of 2020. Five years from now, you’ll have a wonderful trip down memory lane to look forward to.
Creating a Collection Craft with Ticket Stubs
Materials Needed:
- Ticket Stubs
- Little Wooden Clothes Pins
- Hanging Wire, Twine or String
- Framed Cork Board
- Clear Mounting Tape
Steps:
- Gather Materials: First, gather all the materials mentioned above. You can find all these materials at a local craft store or online.
- Prepare your Ticket Stubs: Sort through your collection of ticket stubs and select your favorites. It could be from a memorable movie, concert or sporting event. Make sure they are clean and dry.
- Arrange your Stubs: Lay out your ticket stubs on your work surface and decide on the way you want them to appear on your cork board. You could arrange them chronologically according to the event date or even by color.
- Attach Ticket Stubs to the Wire: Using your wooden clothes pins, clip each ticket stub to your hanging wire. Make sure the ticket stubs are evenly spaced and secure.
- Attach the Wire to the Cork Board: Once all your ticket stubs are attached to the wire, hang the wire across your framed cork board. You can secure the wire onto the board using the clear mounting tape. If you are using twine or string, you might have to tie the ends to the frame of the cork board for secure placement.
- Final Touches: Adjust your ticket stubs one last time to ensure they are displayed to your liking. You can now hang your cork board in your desired location!