


As an affiliate, I earn from qualifying purchases, but this doesn't affect the reviews or recommendations—your trust is important to me!
Creating Your Own Galaxy Bath Bombs at Home
Today, We're Making:
- - DIY Galaxy Bath Bombs
- - 1. Moon and Stars String Art: Using a piece of wood, hammer, nails and strings, kids can create a beautiful piece of art featuring moon and stars. It will not only be a fun project, but also a lovely decoration representing the space theme.
Stepping into a Galaxy-Themed Bath: A Stargazing Experience
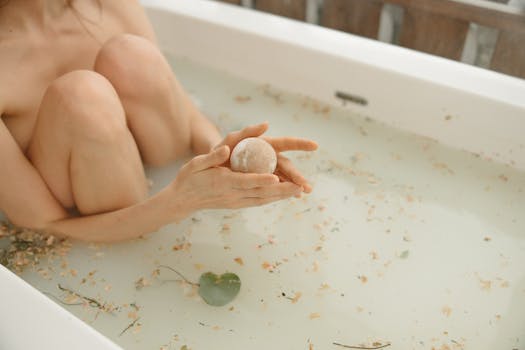
Stepping into a galaxy-themed bath comes second only to stargazing on a clear summer night. But, who would have thought crafting your own DIY Galaxy Bath Bombs could be just as mesmerizing?
Bringing the Ethereal Beauty of a Glittering Galaxy to Your Spa
This fun DIY project allows you to bring the ethereal beauty of a glittering galaxy right into your home spa treatment. As you bask in the soothing warmth of your bath, these homemade Bath Bombs will twirl and fizz, releasing a swirl of vibrant colors and intoxicating aromas.
A Creative Yet Straightforward Bath Bomb Recipe
Whether you're a seasoned DIY beauty products enthusiast, or you're just looking for new ways to bring wellness at home, this creative yet straightforward bath bomb recipe is set to turn your regular bath into a journey through the cosmos.
Let's Dive into the Universe of Handcrafted Bath Bombs
So let's dive into the universe of handcrafted bath bombs, shall we?
Launching Into The Universe Of DIY Galaxy Bath Bombs
Launching into the universe of DIY Galaxy Bath Bombs begins with the gathering of the basic bath bomb ingredients. First, choose your essential oils. The possibilities are limitless! Opt for lavender for a calming experience, peppermint for an invigorating soak, or a mix of your favorite oils for a personal touch. Apart from these natural fragrances, be ready with some household staples. You'll need baking soda for the fizz, citric acid for the sparkle, cornstarch for the firmness, and Epsom salt for the therapeutic bath treatment goodness. And of course, a touch of skin-safe colorants and cosmetic glitter will bring the galaxy magic alive!
Making Your Own Bath Bombs
Now, let's move to the central part of crafting bath bombs at home: the creation process. Begin by mixing the dry ingredients together. Once they're blended nicely, slowly incorporate the wet ingredients, stirring constantly. Be careful to not add too much liquid; otherwise your bath bomb might start the fizzing process prematurely. The mixture should just hold together when pressed but still be somewhat crumbly. Think of the consistency of slightly damp sand - perfect for molding into whatever shapes your heart desires. A spherical mold may seem like an obvious choice, but don’t be afraid to explore other celestial designs as well to enhance the fun in these fun DIY projects!
Benefits of DIY Beauty Products
Crafting DIY beauty products like these bathroom enhancers not only enables you to customize them according to your preferences but also promotes wellness at home. As the homemade Galaxy Bath Bombs dance across your bathwater, releasing their heavenly scents and jewel-like colors, you can find peace in the fact that you knew exactly what went into them. Say goodbye to any harsh chemicals often found in store-bought products! Embrace the natural skincare cocktail that these fizzy bath bombs provide, truly transforming your bathing experience into a personal home spa treatment.
Creating Personal Spa Treatment at Home
Each galaxy bath bomb you make opens up a new opportunity for an at-home relaxation experience that is truly out of this world. Night after night, bath time after bath time, you'll be stepping into a far-off universe while never leaving the comfort of your home. Plus, the process of making these stellar bath delights is just as peaceful and rewarding as using them. After all, handcrafted bath bombs will not only offer you a sense of accomplishment but also unlock the beauty benefits of these amazing skincare DIY marvels.
Transform Your Bath Experience
Transforming bath time with DIY Galaxy Bath Bombs is no less than a star-studded affair. It is fun, experimental, therapeutic, and lets you infuse your wellness routine with a dose of cosmic energy. It's a way to bring the celestial magic into your personal care, allowing you to unwind like a star. So don't wait to turn your bath into a galactic adventure — with your homemade bath bombs, it's your personal universe!

Creating Your Own Galaxy Bath Bombs
In conclusion, creating your own galaxy bath bombs at home is more than just a DIY project — it's a journey through the cosmos from the comfort of your bathtub. You not only fill your wellness routine with unique scents and vibrant hues, but also with a joy of crafting that's truly out of this world.
Its Time To Add A Dash Of Stardust To Your Bath Time
Embracing beauty, relaxation, and wellness with each fizz and swirl. So set out on a stellar adventure, make your own galaxy bath bombs, and let them spin and twirl their magic into your bath, bringing the stunning universe closer to you, one bath at a time.
Happy crafting and stargazing, my friends!

You May Also Like These:
Moon and Stars String Art
Engage your kids in this fun DIY craft project. Not only does this project entertain, it helps your kids develop fine motor skills and foster creativity. Here is a step-by-step guide to creating a beautiful piece of Moon and Stars string art.
Ingredients:
- Wooden Board: Any size will do, but a 12'x12' works best.
- String: Choose your colors, but we recommend white, yellow, or silver.
- Nails: Small nails work best, about 1' in length.
- Hammer: To secure the nails in the wooden board.
- Printed Templates: Of your choice of a moon and stars.
- Scissors: For cutting out the template and string.
- Tape: Any kind, to temporarily secure your template to the board.
Instructions:
- Prepare the Wooden Board : Ensure the board is clean and ready for your project.
- Cut Out Template : Use the scissors to cut out the printed moon and stars template.
- Secure Template : Place the template on the wooden board in your desired location and use tape to keep it in place.
- Insert Nails : Hammer nails along the outline of the template. Ensure the nails are secure but don't hammer them all the way in - you need space to wind the string.
- Remove Template : Once all the nails are in place, carefully remove the template from the board.
- String Art : Begin winding the string around the nails to create your design. Change the string color if you desire – white for the moon and yellow for the stars, for example.
- Finish : Once you've filled in your design with the string, secure the end of the string with a knot or a small dab of glue. And voila, your Moon and Stars String Art is complete!
Nails and Strings Craft Instructions
Ingredients
- 1 Wooden Board: A canvas for your art.
- Several Small Nails: Used to make the design.
- Cotton Thread or String: Color of your choice to weave around the nails.
- Hammer: To secure the nails into the board.
- Pencil and Paper: To sketch your design before starting.
Procedure
- Sketch Your Design
- Transfer the Design
- Hammer the Nails
- Start Stringing
- Finish Off Your Piece
To begin, sketch out the design you want to create on your pencil and paper. Make sure it fits within the dimensions of the wooden board you will be using.
Next, lightly draw your design on the wooden board using the pencil.
Using your hammer, put nails into the wooden board along the lines of your drawing. Make sure the nails are evenly spaced. They should be deep enough to stay firmly in place, but not so deep that no more than half the nail is in the wood.
Now, tie the end of your string or thread around the first nail. Start weaving the string around the nails, following the shape of your design. Be sure to loop the string around each nail at least once before moving to the next.
Once you've finished stringing all your nails, cut off any excess string and tie off the end on the last nail. Be sure it's secure so your design won't unravel!
Nails and Strings Craft Project Instructions
Ingredients
- A wooden board: Select a wooden board suitable for your design. The size and shape will depend on your preference.
- Nails: You will need about 100-200 nails depending on the size of your design. Choose nails with a flat head for easy string wrapping.
- Hammer: A small hammer is perfect for this craft project.
- String: Choose a strong, durable string. The color will also depend on your preference.
- Printed template: Print out a design of your choice to use as a template.
- Adhesive tape: You will use this to secure your template to the wooden board.
Instructions
- Prepare your workspace: Clean and clear out your workspace. Make sure you have a hard surface to hammer on.
- Secure your template: Using your adhesive tape, secure your printed design onto the wooden board.
- Hammer the Nails: Start hammering the nails into the wood along the lines of your template. Ensure that all nails are equal in height.
- Remove the Template: Gently pull off the template from the board, making sure not to dislodge any nails.
- Start Stringing: Start from one nail and begin wrapping the string around each nail. Continue along your pattern until your design is filled out.
- Finish Up: When you're done with your design, secure the end of the string to a nail with a knot or a small dab of glue.
- Final Touches: Make any necessary adjustments to the strings or nails to make your design look its best.
Moon and Stars Craft
This craft requires the following materials:
- Blue construction paper
- Silver glitter
- White paint
- Paintbrush
- Scissors
- White chalk
- Glue
Here are the steps to create your moon and stars craft:
- Prepare Your Workspace: Begin by clearing a space on a table and laying out a covering to protect from any spills or glitter escapees. Have all your materials ready.
- Cut Out Moon and Stars: Using your scissors, cut out a large circle for the moon and various smaller circles for the stars from the blue construction paper.
- Add Silver details: Dab a bit of glue onto the moon and stars, then sprinkle silver glitter over them. Let dry.
- Draw The Backdrop: With your white chalk, draw faint outlines of clouds on the remaining blue construction paper. This will serve as your sky.
- Paint the Clouds: Using your white paint and a paintbrush, fill in the cloud outlines. Let them dry as well.
- Attach Moon and Stars: Arrange the dry glittered moon and stars onto the sky paper and use glue to secure them in place.
- Let Everything Dry: Allow your masterpiece to completely dry, then proudly display your child’s moon and stars nighttime scene!
Space Themed Craft for Parents and Kids
Materials You'll Need:
- Cardstock Paper (Black, Blue, White)
- Glue
- Scissors
- Markers or Crayons
- Glitter (Optional)
Instructions:
- Cut a Circle: Start by cutting a large circle out of the blue or black cardstock. This will represent our space.
- Draw Planets: Use the white cardstock to draw and cut out various sizes of circles. These will be our planets.
- Color the Planets: Use your markers or crayons to color in each of the planets.
- Glue the Planets: Start adding your planets. Glue them wherever you like on your large circle space.
- Add Stars: Now we'll add stars. Use the white marker or crayon to make small dots all over the black/blue space to represent distant stars.
- Optional - Add Glitter: If you want to add a little sparkle, lightly sprinkle some glitter over the glue while it’s still wet. This will give the effect of a starry sky.
- Let It Dry: Once you're happy with your space scene, let it dry thoroughly before hanging.


