


As an affiliate, I earn from qualifying purchases, but this doesn't affect the reviews or recommendations—your trust is important to me!
Creating Your Own Enchanting Fairy Garden Terrarium at Home

Today, We're Making:
- - DIY Fairy Garden Terrarium
- - 'Time Capsule Mason Jars': Kids can create their own mini time capsules using mason jars, filled with items that represent their favorite things in 2025. The jars can include photos, toys, coins, or notes and can be decorated with paints and stickers.
- - 'DIY Fairy Garden Ornaments': Children can create their own miniature fairy garden ornaments using clay or salt dough.
Imagine an Enchanting Oasis in Your Home
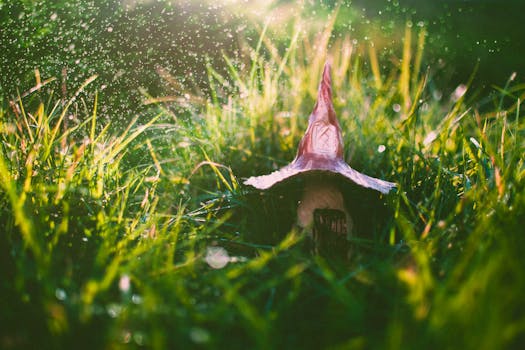
Imagine an enchanting oasis where time stands still, faeries flutter, and a serene calm washes over you like a dew-kissed morning. Sounds divine, doesn't it? Well, say goodbye to the mundane and welcome the charm of miniature gardening right at your home.
Creating a DIY Fairy Garden Terrarium
Creating a DIY Fairy Garden Terrarium is not just about adding an element of whimsy to your indoor gardening, it's about crafting a space that reflects your personality, creativity, and love for all things magical.
Our detailed how-to guide
Our detailed how-to guide will take you step-by-step in creating a fairy garden that's not just appealing to the eye, but also an eco-friendly addition to your home decor.
Are You Ready?
So are you ready to sprinkle some pixie dust and bring your dream fairy garden to life? Then let's dive right into it.
Choosing the Right Container for Your DIY Fairy Garden Terrarium
You'll mostly find that the first captivating step towards creating your fairy garden terrarium is choosing the right container. Think of the container as the stage where you will be choreographing the story of your mini enchanted garden. You can opt for a glass dome, cloche, mason jar, or even a stunning aquarium. Remember, it's about creating a terrarium that suits your personality while also ensuring it provides enough space for the fairy garden accessories. Smaller containers are perfect for those starting their journey into indoor gardening, while larger ones offer ample room for creativity and complexities in your garden design.
Getting Creative with Terrarium Plants and Fairy Garden Accessories
Once the housing for your dream fairy garden is decided, it's time to delve into the selection of terrarium plants and fairy garden decor. Arranging the plants in your DIY garden project is akin to laying the foundation of a magical realm. Select different types of indoor plants, from moss and ferns to baby tears and dwarf miniatures. These plants not only add diversity to your enchanted garden but also help maintain an optimal environment inside the terrarium.
As for the fairy garden accessories, add everything from miniature bridges, fairy houses, stepping stones to whimsical fairy statues that truly encapsulate the essence of a fairy garden terrarium. Remember, the idea is to optimize and transform your home decor with an eco-friendly addition.
The Art of Arranging Your Indoor Fairy Garden
Arranging the elements within your DIY terrarium is where the real magic happens. Much like putting together a puzzle, creating a terrarium involves piecing together a serene snippet of nature. Start by placing a layer of pebbles at the bottom of your container, which will act as a drainage system for your indoor plants. Overlay this with activated charcoal, to keep the water fresh, and your soil fungus free.
When arranging your terrarium plants, pay close attention to the specifics of your chosen greenery. Some plants may prefer a sunnier spot, while others might thrive better in shadowy nooks. Remember that your miniature fairy garden is all about balance, both visually and physiologically.
Getting your hands on a DIY Fairy Garden Terrarium isn’t just an enchanting garden craft; it’s an opportunity to explore your creativity. Through each step of your terrarium tutorial from your how-to guide, you are not only creating an art piece but also committing to sustainable living and green home practices. This indoor gardening hobby opens the doorway to an awe-inspiring realm of serenity, fairy magic, and horticultural wonder.

And there you have it, folks!
By embracing the mystical charm of a Fairy Garden Terrarium, you're doing more than just resulting in an aesthetically pleasing piece of home decor. You are embarking on a journey of self-expression, personal growth, and ecological responsibility. With each tiny touch—an intricately placed fairy bridge here, a charming little mushroom there—you're weaving a narrative that reflects your individualism.
Who knew a simple act of fairy garden creation could be so empowering? So, go on, my pixie gardeners, create your own piece of enchantment, engage with the earth and get to revel in a well-deserved sense of accomplishment and pure mystical delight. Good luck on your magical journey! Until then, may your days always be filled with fairy dust and sunshine.
You May Also Like These:
Time Capsule Mason Jars Craft
Materials Needed:
- Mason Jars: You'll want clear jars so you can see everything inside. Any size will work.
- Scrap Paper: This can be pictures, drawings, old book pages, or even just colorful paper.
- Markers: Used for decorating or writing on the paper.
- Glue/Adhesive: This will be used to secure the scrap paper to the inside of the mason jar.
- Precious Little Items: These can be toys, trinkets or anything your child wants to remember when they open their time capsule.
Instructions:
- First, have your child select and prepare the items they want to include in their time capsule. This could be a favorite toy, a drawing, a letter to their future self or anything else they want to remember in the future.
- Next, carefully glue the scrap paper to the inside of the mason jar. This will serve as a colorful backdrop for the items, so be creative!
- Once the glue has dried, carefully place the selected items into the jar. Be sure to arrange them so you can see everything from the outside of the jar.
- Finally, tightly screw the lid back onto the jar, ensuring that everything is securely contained inside.
- Lastly, choose a safe spot to store the time capsule until the decided time to open it.
Create Your Own Paper Plate Dinosaur
Here is a simple, fun craft for your child to create their own dinosaur toy out of just a few basic materials.
Ingredients:
- Two paper plates
- Green paint
- Paint brush
- Scissors
- Glue
- Googly eyes
- Marker pens
Instructions:
- Cut one of the paper plates in half. This will be the body of the dinosaur.
- Paint the front of the paper plates with the green paint. Let it dry.
- Take the full paper plate, and cut out two Dinosaur feet and a head. Refer to a picture of a dinosaur for help if needed.
- Using the glue, attach the head and feet to the straight edge of the half paper plate.
- Glue the googly eyes to the face and draw a mouth with the marker pens.
- Allow all pieces to dry before playing.
Parents Guide: Crafts for Toys Instructions
Homemade Rainbow Slime Toy
Ingredients:
- 1 bottle of clear glue (147ml)
- 1/2 teaspoon borax
- 1 cup water (divided into two halves)
- Food coloring (red, blue, green, yellow)
- Glitter (optional)
Instructions:
- In a bowl, mix the clear glue with 1/2 cup of water by stirring it slowly.
- In another bowl, mix the other 1/2 cup of water with 1/2 teaspoon borax until it is fully dissolved.
- Slowly add the borax solution into the glue mixture. Keep stirring until you see the mixture turning into slime.
- Now divide the slime into four equal parts.
- Add a different food coloring to each part and mix well until the color is evenly spread.
- Layer the colored slime one on top of the other to get your rainbow slime toy!
- Add glitter on top for extra sparkle (optional).
Water Bottle Spin Art
Ingredients:
- Empty water bottles with caps
- Acrylic paint (multiple colors)
- Salad spinner
Instructions:
- Take an empty water bottle and fill it 1/3rd with different colors of acrylic paint.
- Securely cap the bottle and shake it until the paint is well mixed.
- Place the bottle in the salad spinner, make sure it fits securely.
- Spin the salad spinner and watch as the paint creates a beautiful spiral pattern on the inside of the bottle.
- Allow to dry.
Crafts for Coins Guide for Parents
Materials Required:- Assorted Coins
- Paper Plate
- Paints and Brushes
- Glue
- Glitter (optional)
- Preparation: Gather all your materials.
- Paper Plate: Take a paper plate and color it as desired. Allow it to dry completely.
- Coins Arrangement: Arrange your coins on the colored paper plate to create a design or pattern of your choice.
- Gluing: Once you're happy with your design, glue the coins onto the plate following the arrangement you chose. Remember to let each coin dry before adding the next.
- Glitter: If you wish to use glitter, now is the time! Sprinkle your choice of glitter over the glued coins for extra sparkle. Then, allow the glue to dry completely.
- Final Touch: Once everything is completely dry, flip over your creation and write your name and the date on the back. This will make it easy for you to remember when you created it!
Crafts for Kids: Homemade Ornaments & DIY Fairy Garden Ornaments
1. Homemade Ornaments:
With just a few household materials, children can personalise their creations and decorate them to their heart's content. Here's what you'll need and how to create these fun ornaments:
- Ingredients:
- Cardboard
- Scissors
- Thread or Ribbon
- Colorful paints
- Stickers
- Instructions:
- Cut the cardboard into shapes of your choice
- Using your paints, color the cardboard cutouts. Allow them to dry
- Decorate the painted cardboard with stickers
- Attach thread or ribbon to create a loop at the top, allowing the ornament to hang
2. DIY Fairy Garden Ornaments:
Kids will love this magical craft! Create tiny fairy garden ornaments using either clay or salt dough. Here's how:
- Ingredients:
- Clay or Salt Dough
- Paint
- Brushes
- Glitter (optional)
- Instructions:
- Shape the clay or salt dough into tiny garden critters, whimsical shapes, or fairy houses
- Let them dry
- Once dry, paint your ornaments and allow them to dry again
- If you'd like, add a touch of sparkle with some glitter


