As an affiliate, I earn from qualifying purchases, but this doesn't affect the reviews or recommendations—your trust is important to me!
DIY Embroidery Hoops: Fun and Creative Craft for Kids

Today, We're Making:
- - Embroidery Hoops
- - Hand-Embroidered Photo Frames: Use an embroidery hoop, colorful threads, and a fabric of choice to create personalized photo frames. Kids can stitch their favorite designs or patterns on the fabric and place their wishing photo inside.
- - Embroidery Hoop Dream Catchers: Kids can create their very own dream catchers using embroidery hoops, yarn, beads and feathers. They can weave intricate designs within the hoop using the yarn and add beads and feathers for an added touch.
- - Personalized Christmas Ornaments: Have the kids use embroidery hoops to make personalized Christmas ornaments. Using holiday-themed fabric or stitching their designs on the fabric.
Remember the Magic of Crayons?
Remember the magic of opening a brand new box of crayons and breathing in the vibrant colors that promised endless possibilities and hours of fun? That sense of anticipation and excitement resonates with embroidery hoops; a hidden gem in the world of DIY children's crafts.
Sparking Imagination through Embroidery Hoop Art
Embroidery hoop art sparks imaginative play, cultivates fine motor skills, and transforms into a personalized masterpiece that just might earn a place of honor on the family refrigerator.
Exploring Creativity with Embroidery Hoops
As a parent, teacher, or guardian, exploring the creative world of embroidery hoops with kids opens avenues for fun-filled, educational activities at home. So are you ready to roll up your sleeves to create handmade crafts imbued with creativity and laughter?
Dive into the Charming World of DIY Embroidery Hoops
Let’s dive into the charming world of DIY embroidery hoops, an uncharted territory of artistic expression for your kids!
Embroidery Hoops: A Canvas of Imagination for Kids
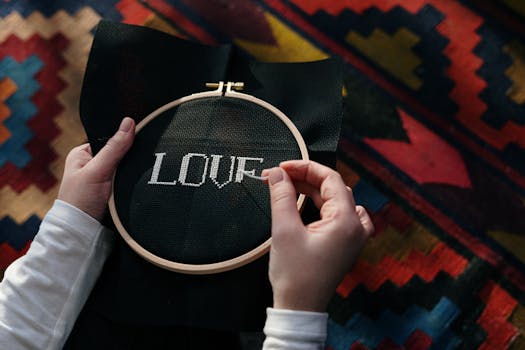
Embroidery hoops are not just frames, but a passport to a realm of imaginative exploration for kids. They are a versatile tool that can be a canvas for a variety of DIY crafts for kids. Seize a rainy afternoon indoors to introduce easy embroidery patterns to your little ones. They offer a hands-on opportunity to observe as a plain piece of fabric evolves into a unique emblem of personalized craft ideas your child has conjured. It's in this mess of multi-colored threads and fluffy tufts of fabric that priceless memories are born, layered over a day of kids' fun activities at home.
Pushing Creative Boundaries
This simple DIY craft pushes boundaries beyond traditional pen-and-paper drawing or painting, which kids are so accustomed to. Embroidery hoop art weaves together threads of different colors in a dance of patterns and designs. It encourages children's crafts to blossom into tangible pieces of art they can touch and feel. Introducing beginner embroidery hoops can spark within your child an interest in sewing crafts for children, a valuable skill they'll carry beyond their formative years. Progressing from basic running stitches to mastering the complex French knot, for instance, will also instill in them a deep and rewarding sense of achievement.
The Value of Handmade Crafts
Let’s not overlook the educational value of these handmade crafts. Embroidery hoops can teach patience and diligence as the kids navigate their way through different stitches and techniques. Transforming their vision into an embroidered reality requires focus and precision: from threading a needle to understanding the twists and turns involved in a stitch. Indeed, embroidery hoop projects for kids have potent learning value packaged in vibrant threads and playful patterns.
Fostering Skill Growth
These DIY children's art projects also foster the growth of fine motor skills. Holding on to the needle, threading it, and making precise stitches on the embroidery hoops are all activities that refine their motor skills and coordination. It's hardly a monotonous exercise though! With every threading and weave, each child creates a unique narrative, draped over the canvas of their DIY embroidery hoops.
Beyond Stitching
It rarely stops with just the stitching though. Utilizing decorative hoop crafts, kids can transform their embroidered artworks into wall décor items, personalized bookmarks and more. It lets them flesh out their artistic abilities, progressively morphing kids into little designers and decorators. This transition from initially introducing easy-to-follow patterns, then gradually encouraging kids to create their own customized designs, nurtures independent thinking, creativity, and artistic intuition.
The Forgiving Art Form
Remember, embroidery is a forgiving art form. Slip-ups can easily be unpicked and reworked, so kids can learn, grow, and experiment without the pressure of mistakes. Overall, the charms and benefits of embroidery hoops as a fun, educational, indoor child-friendly activity are hard to resist; not to mention the beautiful handcrafted gift possibilities they offer. So, why wait? Let’s thread the needle and begin this exciting journey through the whimsical world of DIY embroidery hoops.

Embroidery Hoop Art: A Journey of Creativity
So, bring out those embroidery hoops, colorful threads, and let the magic unfold. Let's create, let's play, let's learn through the delightful realm of DIY embroidery. Hold the safety scissors, embrace the colors, treat those small fingers to a dance with fine threads. Fill your home with laughter and creativity.
Create those precious moments of joy and inspiration for your children by initiating them into the mesmerizing world of embroidery hoop art. It's more than just a craft. It’s a journey of discovery, a celebration of imagination and a colorful adventure waiting to be embarked upon, stitched one loop at a time.
It's time to create memories to be cherished for a lifetime. So dive in, the world of DIY embroidery hoops is waiting to be explored!

You May Also Like These:
Hand-Embroidered Photo Frames using an Embroidery Hoop:
Ingredients:
- Embroidery hoop (size suited to your photo size)
- Embroidery needle
- Colorful embroidery threads
- Fabric of your choice (must be big enough to fit into your embroidery hoop)
- A printed photo (to fit inside your embroidery hoop)
- Glue
- Scissors
Instructions:
- Place your fabric in the embroidery hoop. Ensure the fabric is taut and secure by tightening the screw at the top of the hoop.
- Choose your design. You could either use a stencil or freehand draw the design around the area where your photo will be placed. Stick to simple patterns like flowers, stars, or simple shapes.
- Thread your needle. Use a color of thread that contrasts with your fabric to make your design stand out.
- Start embroidering. Follow the design and start stitching from the back side of the fabric. Make sure all stitches are tight but not pulling the fabric.
- Continue embroidering till your design is complete. You can switch colors of thread as needed. Always make sure to secure each end of thread at the back of the fabric.
- Once your embroidery is done, place the photo in the center of the design. Check how it looks and adjust as needed.
- Secure the photo to the fabric. Apply glue to the back of your photo - be careful not to to put too much - and press it onto the fabric, ensuring it's in the center of your design.
- Let it dry. Allow the frame to dry fully before handling or hanging.
Craft for Colorful Threads
Ingredients:
- Colorful threads of varied thicknesses
- A piece of thick cardboard or canvas
- Scissors
- Glue or thread tape
- A needle (optional)
Instructions:
- Prepare the Base: Take the piece of thick cardboard or canvas and trim it to your desired size. This piece will serve as the base of your craft project.
- Select the threads: Choose the colorful threads you will use in your craft. You can go for a mix of thicknesses and shades to add variety and depth to your design.
- Design your Craft: Plan out your design on the base. You could draw out something or freestyle, creating abstract shapes and lines. This is where you let your creativity shine!
- Secure the Threads: Use the glue or thread tape to secure the threads on the base according to your design. If you're going for a more textured look or working with thicker threads, you might need to use a needle to help position and secure the threads.
- Let it Dry: Once you are satisfied with your design, let the craft dry completely before handling or displaying it.
Craft Instructions for Personalized Photo Frames
Ingredients:
- Small pieces of your chosen fabric
- Embroidery thread in various colors
- Embroidery needle
- Small photo (not larger than the fabric size)
- Embroidery hoop
- Felt
- Scissors
- Glue
Instructions:
-
1. Prepping the Fabric:
- Take your fabric and place it over the embroidery hoop, ensuring it's smooth and tightly secured.
- Trim off any extra fabric around the hoop for a neat appearance.
- Choose the embroidery pattern and colors your child likes.
- Thread the needle and start the embroidery on the fabric. This is a great time to let the kids show their creativity.
- Once the embroidery is completed, tighten the fabric on the embroidery hoop again if needed.
- Remove the outer hoop and place the chosen photo onto the rear end of the fabric (the side without the embroidery).
- Secure the photo with a piece of clear tape.
- Glue a piece of felt to the back of the hoop, securing the edges with more glue if necessary. This will conceal the back of your embroidery and hold the photo in place.
- Allow it to dry, trim off any excess felt, and it's ready to use or gift to someone special.
Craft Instructions for Embroidery Hoop Dream Catchers
Ingredients:
- Embroidery hoops
- Various colors of embroidery thread
- Beading and feathers
- Fabric glue
- Scissors
Instructions:
1. Prepping the Hoop:
- Unscrew the embroidery hoop and remove the inner circle.
2. Stringing the Web:
- Choose thread color for the web. Make a knot on the hoop and wrap it around the hoop in a web-like pattern.
- Secure the web with a knot when completed.
3. Adding Beads and Feathers:
- At the end of the each section of the web, add beads or feathers as desired, securing with fabric glue.
4. Hanging:
- Attach a length of thread to the top for hanging. End with a secure knot.
- Unscrew the embroidery hoop and remove the inner circle.
- Choose thread color for the web. Make a knot on the hoop and wrap it around the hoop in a web-like pattern.
- Secure the web with a knot when completed.
- At the end of the each section of the web, add beads or feathers as desired, securing with fabric glue.
- Attach a length of thread to the top for hanging. End with a secure knot.
Yarn Crafts for Parents
This guide provides you with an easy-to-follow, printable set of instructions for a common yarn craft: a yarn-wrapped vase. Read through each step thoroughly before starting on the craft to ensure a smooth process.
Ingredients
- 1 clear glass vase - The size will depend on where you want to display it, but a standard size vase works well.
- Various colors of yarn - Choose three different colors for a fun, colorful look.
- Scissors - You'll need these to cut the yarn.
- Glue - A hot glue gun works best if you have one, but regular craft glue will also do the job.
Instructions
- Prepare your vase: Clean your vase with warm, soapy water to remove any dirt or residue. Pat dry with a soft cloth.
- Begin wrapping: Apply a small dot of glue on the bottom of your vase. Stick the end of your first color of yarn on the glue. Begin to wrap it around tightly, ensuring no glass is showing through. You can apply a small dot of glue after every few wraps to keep it in place, but this is optional.
- Change colors: Once you've wrapped about a third of the vase in the first yarn color, cut the yarn and secure the end with glue. Repeat the wrapping process with your second color of yarn, followed by your third color.
- Finish off: Once you've finished wrapping the vase in yarn, cut the end and secure it with a dot of glue. Make sure all yarn is tightly wrapped and secured before displaying.
Enjoy your new, brightly colored, yarn-wrapped vase!
Personalized Christmas Ornaments
Ingredients:
- Embroidery hoops of various sizes
- Holiday-themed fabric or plain fabric for children to design on
- Thread and needles
- Beads
- Feathers
- Scissors
- Yarn
Instructions:
- Gather all materials: Make sure you have all your ingredients handy. Choose different sizes of embroidery hoops and the holiday-themed fabric of your choice. Also, keep thread, needles, beads, feathers, scissors, and yarn ready.
- Prep the embroidery hoop: Tighten the holiday-themed fabric or the plain fabric that your children will design on into the embroidery hoop.
- Stitch the main design: Using the threaded needle, start creating your desired designs on the fabric. Kids can stitch their initials, Christmas symbols, or any other design they like.
- Add beads and feathers: This step is meant to give a special touch to the ornament. Weave beads and feathers as desired within the hoop using the yarn. It not only adds to the festivity but also enhances dexterity and creativity amongst kids.
- Trim the excess fabric: Once your design is complete, use the scissors to carefully trim any excess fabric around the edges of the embroidery hoop.
- Finishing off: Use yarn to create a loop on top of the embroidery hoop. This loop can be used to hang the ornament.
These personalized Christmas ornaments are not only fun to make but are also a great way to boost the festive atmosphere at home. Plus, they can serve as adorable, homemade gifts for friends and family.


