


As an affiliate, I earn from qualifying purchases, but this doesn't affect the reviews or recommendations—your trust is important to me!
Exploring : Unlocking Creativity with Homemade Galaxy Slime DIY Craft
Today, We're Making:
- - Galaxy Slime DIY Craft
- - Space-Themed Bookmark DIY: Simple and low-budget, this craft requires some cardstock, markers, string and a hole puncher. Kids can sketch out their favorite planets, stars.
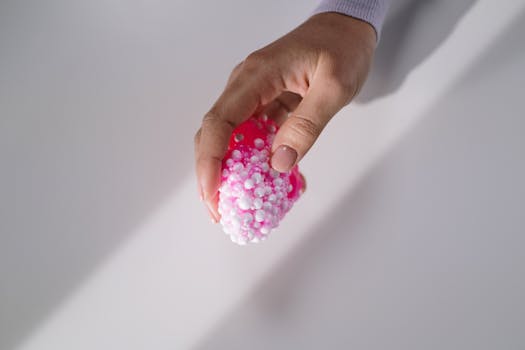
Looking for a burst of creativity from the comfort of home? Meet the enchanting and vibrant Galaxy Slime DIY Craft.
Picture it: your kitchen table transformed into a swirling, sparkling universe, entertaining both young and old souls alike. This DIY project does more than just stir up a colourful concoction of glitter and goo. It's a fantastic hands-on activity that unlocks creativity, offering a playful and tangible journey into the vast realm of arts and crafts.
This homemade craft is not just about Slime Making; it’s a sensory play opportunity that invokes the beauty and mystery of the cosmos right in your own home. So, are you ready to invent your very own galaxy?
Let's dive into the mesmerizing world of Homemade Galaxy Slime.
The Magic of Homemade Galaxy Slime
Making Homemade Galaxy Slime is like building a bridge between art and science. It offers an exciting platform that stimulates your imagination while giving you a glimpse into the cool chemistry that transforms simple components into a fascinating, shimmery substance. The magic begins as you watch the slime take shape, gradually forming an indescribable blend of colours, a mesmerising creation akin to the limitless expanse of the universe. And no two homemade crafts are ever the same! Each batch of Galaxy Slime DIY Craft is a unique piece of creativity, a testament to the imaginative prowess we all possess.
Don't let the vibrant aesthetics fool you; this fun craft is more than just a pretty display. It serves as an engaging hands-on activity that promotes learning, creativity, and fine motor skills. The entire family can get their hands dirty, making it an excellent opportunity for parent-child crafts. Whether you're a seasoned DIYer or just dabbling in DIY Projects, the process of creating this enchanting, colourful slime promises to be a fun, memorable experience!
Galaxy Slime DIY Craft: A Personal Journey Through the Cosmos
If you're a visual learner needing an inspiration nudge, then Galaxy Slime DIY Craft may be your ticket. The tactile and visual sensory play intertwined with this easy craft enhances focus and patience. It’s therapeutic, and enables you to unlock creativity as you design your own miniature cosmos. It’s similar to having the universe on your kitchen table. Creating galaxies, nebulae, stars and planets; it's a sensory feast, inspiring not just kids but also adults.
With Homemade Galaxy Slime, everyone can appreciate the beauty of our cosmos from a new perspective. Just as the universe continues to surprise and offer different views, each slime craft too is never the same. You can make your slime as vibrant or as mysterious as you like, as full of glitter or as elegant. This DIY Galaxy Slime can become a wonderful tool of self-expression and an excellent addition to your repertoire of art projects. It's not just slime making; it's crafting your universe!
Inviting Creativity with DIY Slime
The beauty of DIY Slime is its simplicity. Besides being an exercise in creativity, the process grants you the thrill of watching ordinary household items convert into something magical and engaging. Think about it: a bit of glue, food coloring, some glitter and a dash of magic (or activating solution) is all it takes to create this wonderful craft.
Learning to make your own slime can also open doors to creative crafts. Once you master the basics, you can experiment with variations - fluffy slime, butter slime, cloud slime, the possibilities are endless. Just like the stars in our galaxy, you can always find something new to explore in this fantastic DIY craft world!

In the Galaxy of Creativity
The Homemade Galaxy Slime DIY Craft
With the Homemade Galaxy Slime DIY Craft, you are the shining star in the galaxy of creativity. This project is more than just a fun craft; it's a journey into the cosmos, a dive into the captivating world of making things with your hands, and a portal that bridges the gap between science and your imagination.
Crafting Your Own Galaxy
When you begin creating your own galaxy, you aren't just playing with glitter and goo; you're igniting a flash of creativity while learning something new and creating beautiful, tangible art. So, roll up your sleeves, get your hands in that cosmic mix, and let your imagination soar to the stars and beyond.
Your Gateway to Unlimited Creative Possibilities
You might just find that this magical universe of DIY Galaxy Slime is your gateway to a world of infinite creative possibilities right at home. Blaze a trail and create your own constellation of creativity. Remember, it's not just slime, it's your universe!

You May Also Like These:
Space-Themed Bookmark DIY for Kids
A fun and easy craft project perfect for little astronauts! Here's how to make your own space-themed bookmark.
Materials:- Cardstock
- Scissors
- Glue
- Markers
- Printable space images (stars, planets, rockets, etc)
- Hole puncher (optional)
- Ribbon (optional)
- First, cut a strip from your cardstock. This will be the base of your bookmark. You can make it as long or short as you’d like, but a good size is about 2 inches wide and 6 inches long.
- Color the base of your bookmark using your markers. You can make a simple pattern, like stripes or polka dots, or something more complex, like a galaxy.
- Next, cut out your printable space images. These can be glued directly onto your bookmark. Be creative! You can create a whole space scene with planets and stars, or simply have a rocket blasting off.
- If you want to add a little something extra to your bookmark, use a hole puncher to make a hole at the top of the bookmark and thread a piece of ribbon through it. This will make it easier to find your place in a book and adds a nice touch.
- Allow any glue to dry completely before you use your new bookmark. Try to keep it flat while it dries to prevent it from warping.
And there you have it – your very own space-themed bookmark! This is a great craft for any space-loving kids and it also makes a perfect gift for friends.
Ingredients:
- Markers of various colors
- White paper or cardboard
- Scissors
- Glue or tape
Instructions:
- Prepare your space: Clear the table and lay out all your materials. Select which markers you want to use in your craft.
- Start the project: Use the markers to draw your desired pattern or image on the white paper. This could be a picture, abstract shapes, or even a scene. Use as many colors as you like and try to fill in as much of the paper as possible for a bold, bright effect.
- Cut out your drawing: Once you are happy with your marker creation, use the scissors to cut it out. If you're doing this project with young children, make sure to do the cutting yourself or supervise carefully.
- Finalizing your creation: Once you’ve cut out your marker drawing, you can decide what you want to do with it. You can glue it onto another piece of paper to make a colorful card, stick it onto a window, or even wrap it around a pencil holder to add some personalized decoration.
Crafts Using Markers for Parents and Kids
Here's a fun and creative way to spend a rainy afternoon with your child. Follow these instructions for a marker art project that encourages creativity and fine motor skills.
Ingredients
- Markers of different colors
- Paper (any size but a larger piece will have more room for creativity)
- Stickers of any size, shape, color or theme
- Glitter or Glitter glue (optional, for some sparkle)
- A pair of scissors
- Glue stick
Instructions
- Prepare the work area: Ensure that your work area is protected by an old tablecloth or newspaper to prevent any unwanted marker stains.
- Color: Allow your child to colour the paper using the markers. They can create various shapes, patterns or even a scene from their favorite story.
- Add stickers: Have your child place stickers around their marker art to add an extra fun element.
- Apply Glitter: If you have decided to use glitter, now is the time to carefully sprinkle some over the drawing for that magical touch. If your are using glitter glue, drawings can be outlined or simply add dots of glitter throughout.
- Let it dry: Place the masterpiece in a safe place to dry to ensure the glitter or glitter glue sets.
- Display: Once dry, your child's artwork is ready to be displayed! Attach it to the fridge, put it in a frame or give to a loved one as a handmade gift.
Planet String Craft Project for kids
Ingredients
- Coloring Pencils
- Cardstock or Heavy Duty Paper
- Hole Puncher
- String
Instructions
- Sketch Your Favorite Planets: On the cardstock or heavy duty paper, have your child sketch out their favorite planets. They can make these as colorful and detailed as they'd like.
- Color the Planets: Use the coloring pencils to color in the planets. Remember, it's a creative expression, so there's no right or wrong colors!
- Cut Out the Planets: Once the drawings are complete, carefully cut out the planets. Adults can assist if necessary.
- Punch Holes: Use the hole puncher to make a hole at the top of each planet drawing.
- Thread the String: Cut out a piece of string long enough to hang where you’d like. Thread one end through the hole in the planet and secure it with a knot.
- Hang Your Planet Strings: Hang your planet strings in your child's room, in the living room, or anywhere else you'd like, as a fun and educational decoration.
Star Crafts for Kids
Ingredients
- Colored Paper: Choose from a variety of colors for your stars.
- Glue: Needed to assemble the parts of your star.
- Scissors: For cutting out your star shapes.
- Ruler: This will help measure your strips accurately.
- Pencil: For creating your star outline.
- Glitter or sequins (optional): For decoration.
Instructions
- Prepare Your Materials: Gather all your materials and clear a workspace on a flat surface.
- Draw a Star: Using your pencil, draw a star shape on your colored paper. If you're not confident in your star-drawing skills, you can find a template online and print it out to trace.
- Cut Out Your Star: Using your scissors, carefully cut out the star.
- Decorate: This step is optional. If you'd like, you can glue sequins or sprinkle some glitter on your star for some extra sparkle.
- Let Dry: Allow your star to dry completely before moving on to the next step. This can take up to an hour, depending on the amount of glue used.
- Enjoy: You've made a beautiful star craft! Hang it on the wall, or attach a loop of string and hang it from the ceiling. Enjoy your homemade, starry decor!


