


As an affiliate, I earn from qualifying purchases, but this doesn't affect the reviews or recommendations—your trust is important to me!
Make a Homemade Thermometer: Simple Science Experiment

Today, We're Making:
- - Homemade Thermometer
- - Making a Basic Homemade Thermometer
- - Creating a Color-Changing Thermometer
- - Experimenting with Different Liquids in a Homemade Thermometer
- - Testing the Accuracy of a Homemade Thermometer
- - Understanding Fahrenheit and Celsius through a DIY Thermometer
Have you ever wondered how that tiny device hanging up on your wall tells you whether it's sweater or swimsuit weather outside?
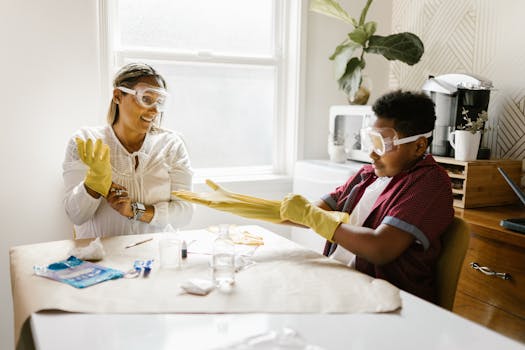
Well, wonder no more! Now, you and your little ones can tap into the inner workings of temperature estimations right on your kitchen table. Welcome to our thermometer-making guide! This homemade thermometer tutorial, a simple science experiment designed for kids, is not only a fun opportunity to engage in DIY science, it’s also a chance to transform everyday household items into an educational science experiment.
Are you ready to turn your cosy home into a cool science lab? Let's get started!
DIY Thermometer Making Guide
Now onto the exciting part; the making of your homemade thermometer. Let's embark on this intriguing DIY science adventure!
Gather Your Materials
First things first, gather your materials. What's fantastic about this project is you don't need anything fancy. All you need is a bottle, water, a straw, rubbing alcohol and clay. These are things that you can easily find lying around the house or at your local store. This thermometer making guide is the epitome of simplicity, transforming ordinary items into extraordinary learning tools.
The Assembly
Moving onto the actual assembly, you start with mixing equal parts of tap water and rubbing alcohol - your thermometer's magic juice! This concoction explores the properties of liquids in physics experiments. If you have a clear bottle that's perfect as you and the kids can have a closer look at the happenings inside. If not, don't sweat it. This thermometer tutorial is designed to be flexible and adaptable.
Placement and Sealing
Next, you want to place the straw into the bottle, ensuring it doesn't touch the bottom. If you're wondering how to build a thermometer that measures accurately, positioning is key! Once your straw is placed correctly, use the clay to make the seal around the top of the bottle. This DIY thermometer project is not just hands-on but also creatively engaging. Remember, the tighter the seal, the less chance there is for the magic juice to evaporate.
Measurement Marks
Your DIY temperature gauge wouldn't be complete without measurement marks. You know, the lines that help you make sense of whether you'll need a scarf or sunscreen when you step outside! You can do this by measuring the rising liquid on a scale, then noting the degree increases as the temperature changes. Your home-made thermometer won't just be a science fair project idea, but a device you can use daily.
The Importance of this Activity
Not only will this build a thermometer activity introduce elementary science experiments to the kids, but it will also undoubtedly ignite the spark for STEM education. This educational science experiment provides an amazing platform for understanding how temperature measurement works in a fun and engaging way.
Put It to Work
Making a thermometer is one thing, but the true joy comes from putting it to work. You can conduct a temperature experiment by placing your homemade thermometer in different locations around the house. This indoor science activity makes an ideal afternoon project. And the lessons learned? Priceless. It's science fun at home like never before.
The Concept of Kitchen Science
Through this at-home learning project, children get to experience a hands-on approach to science. What makes it even more enjoyable is the concept of kitchen science. That's right! Your little ones get to be scientists in their own kitchen, experimenting, observing, and learning in a safe and familiar environment.
Ready to Begin?
So, are you ready to make your own thermometer? The 'lab' awaits! Prepare to be amazed at how a simple DIY educational project can unleash a whirl of scientific curiosity and discovery right in your living room.

Our Kitchen-Table Science Experiment
And there we have it! Our kitchen-table science experiment has come to life. Together, we've transformed common household items into a functional, homemade thermometer. More than just an afternoon project, this experiment brings science to life, right here in the comfort of your own home. Your budding little scientists have been the main characters in the thrilling plot of discovery, observation, and learning. You should be proud of what you've learned and achieved today.
Remember, indeed, the joy of science lies not only in knowledge but also in the expedition of uncovering new things. So, let’s keep exploring, keep questioning, and keep making everyday science fun. Until our next science adventure, stay curious!

You May Also Like These:
Homemade Thermometer STEM Experiment
Objective:
Learn the basic principle of how a thermometer works by creating your own at home.
Ingredients:
- A clear, plastic, narrow-necked bottle
- Water
- Food coloring (optional)
- Clear straw
- Modeling clay
- Temperature chart (for reference)
- Marker or tape (for marking levels)
Instructions:
1. Prepare the Bottle:
- Fill the bottle about 1/4 full with equal parts of warm and cold tap water.
- Add a few drops of food coloring. This is optional, but it will make the water easier to see.
2. Install the Straw:
- Put the straw in the bottle, but do not let it touch the bottom.
- Wrap the top of the bottle with the modelling clay, securing the straw in place but also ensuring a seal around the bottle's opening, not allowing any air to escape.
- Note: make sure straw is sticking out of the clay seal - the top of the straw should be open to the air.
3. Adjust and Observe:
- Mark the level of the water in the straw and place your homemade thermometer next to the reference thermometer (if available).
- Observe and note down the water level in the straw at different times of the day, marking the straw at each interval. If possible, note down the temperature from the reference thermometer as well.
- Over time, the water level in the straw will rise and fall with temperature changes, you have created a basic thermometer!
4. Conclusion:
- If your child enjoys this experiment, they may also enjoy learning more about how professional thermometers are made and exploring other aspects of meteorology.
Create a Color-Changing Thermometer Experiment
Ingredients:
You will need the following items:
- Clear straw
- Modeling clay (non-hardening)
- Water
- Food coloring (red works best)
- Transparent glass
- Thermometer (for comparison)
Steps:
Follow these steps to create your own color-changing thermometer:
- Take the straw and form a tight seal at one end using the modeling clay. Ensure no water can leak through.
- Fill the glass with water.
- Add a few drops of food coloring to the water and stir until the color is uniform.
- Immerse the open end of the straw in the colored water, but make sure the clay-sealed end is not submerged.
- Pinch the top of the straw and pull it out of the water. There should be colored water in the straw.
- We are now ready to use our homemade thermometer. Place your sealed straw next to a real thermometer.
- Observe and record the level of water in the straw as temperature changes. As the temperature rises, the water level should go up due to the expansion of the air in the straw.
- Compare the changes in your homemade thermometer to the readings of the real thermometer for accuracy.
Introduction:
This is a fun and engaging activity to introduce kids to the basic principles of temperature and thermometers. By using household items to create a homemade thermometer, this experiment allows children to work with their hands and observe how different liquids respond to changes in temperature.
Ingredients:
- A transparent glass or plastic container (like a clear vase or water bottle)
- Three different types of liquids (water, rubbing alcohol, vegetable oil are recommended)
- Food coloring (optional but helpful)
- A straw and some clay or Play-Doh
- Tap water and ice cubes
- Thermometer for the comparison
Instructions:
- Thoroughly clean and dry your container.
- Now fill the container about 1/3 full with one of your liquids. For example, start with water.
- Add a few drops of food coloring if you wish. This isn’t necessary, but it will make the liquid easier to see.
- Insert the straw into the liquid-filled container but don’t let it touch the bottom.
- Use your clay or Play-Doh to seal the top area of the container around the straw, ensuring it stands upright but can still move freely up and down. Make sure there are no air gaps.
- Observe and note the level of the liquid in the straw. You have now completed your homemade thermometer.
- Now take your homemade thermometer and a real thermometer and place them both into a bowl of tap water and note the level of the liquid in the straw and the temperature on the real thermometer. Then transfer both to a bowl of ice water and again note the changes.
- Drain the container, ensure it’s dry, and repeat the process for the remaining two liquids. Compare the results.
Conclusion:
This experiment is a fun way to understand the basic principles of how a thermometer works by seeing firsthand how different liquids expand and contract with temperature changes.
Homemade Thermometer Experiment
Objective
This experiment is meant to help make a functioning homemade thermometer and test its accuracy using scientific principles.
Ingredients
- A clear plastic or glass container
- Water
- Isopropyl Alcohol (Optional)
- Red or blue food coloring
- Clear plastic straw
- Craft Clay
- Ruler or Thermometer for calibration
Procedure
Creating the Thermometer
- Fill your clear container about 1/4 of the way full with equal parts tap water and isopropyl alcohol.
- Add a few drops of food coloring. The coloring simply makes changes in temperature easier to see.
- Put the straw into the container but make sure it doesn't touch the bottom.
- Use the clay to seal the container where the straw comes out. It should be sealed around the straw so that it can still move up and down, but air can't get in or out of the container.
- Now you should notice that when you put your hand around the container, the colored water/alcohol mix in the straw begins to move up through the straw.
Calibrating the Thermometer
- For the thermometer to be useful, it needs to be calibrated. Use a regular thermometer to measure the temperature of the room and then mark it on the straw with a sharpie (or a piece of tape wrapped around the straw).
- You can additionally place the homemade thermometer in a bath of known temperature to add additional calibration marks.
Using the Thermometer
- Once it's been calibrated, leave it somewhere and watch the temperature change! The warm and cold air molecules interact with the molecules in the bottle, making them expand and contract which causes the water in the straw to rise and fall.
Conclusion
This experiment should help demonstrate the principle of thermal expansion and contraction. It also offers a firsthand way of monitoring the temperature changes within your own environment.
Sure, here's an HTML code containing the instructions to create a DIY thermometer. It's designed to be both clear and printable. ```HTML
DIY Thermometer: Understanding Fahrenheit and Celsius
Ingredients:
- 1 Clear plastic or glass container (a clear, empty bottle works great)
- Water
- Rubbing Alcohol
- Red or Blue Food Coloring
- Clear Plastic Straw
- Clay
- Thermometer (for calibration)
Instructions:
Step 1:
Fill about a quarter of the bottle with equal parts of water and rubbing alcohol.
Step 2:
Add a few drops of food coloring. This will make the liquid easier to see.
Step 3:
Insert the straw into the bottle, but don't let it touch the bottom.
Step 4:
Use the clay to seal the neck of the bottle and hold the straw in place. Make sure the seal is tight, but be careful not to squeeze the straw shut.
Step 5:
You've now created a DIY thermometer! Place it next to a commercial thermometer. Observe the difference between the readings in Fahrenheit and Celsius degrees when the temperature in the room changes. This will help you understand how a thermometer works and how to read both Fahrenheit and Celsius scales.
Note: The DIY thermometer won't exhibit exact measurements like a commercial thermometer. Its primary function is to demonstrate the principle of how a thermometer works.
``` This HTML code when executed will display a webpage with left-aligned text containing all the necessary instructions for this STEM experiment.


