


As an affiliate, I earn from qualifying purchases, but this doesn't affect the reviews or recommendations—your trust is important to me!
Mastering The Art Of Creating Your Own Slime Experiment

Today, We're Making:
```
Things to add in the bullet list:
- - Make Your Own Slime Experiment
- - DIY Solar System: Connect this project with the date by educating kids about what the solar system looked like on March 8, 2025. Kids can recreate the solar system using bouncing balls of different sizes, paint them accordingly, and position them to reflect the actual positions of the planets on the given date.
- - Water Filtration System: This project can be linked with the date by discussing the importance of clean water and its relevance in future years like 2025. Using easily available materials like sand, charcoal.
Did you know?
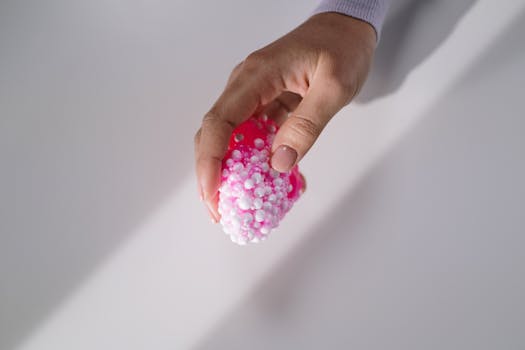
Creating your own slime experiment is not only a fun adventure, but also a great way to introduce basic scientific concepts to the young and curious minds!
Welcome to your DIY Slime crafting guide
Here, we take the mystery out of mastering slime creation. As we delve into the exciting world of homemade slime - preparing the perfect slime consistency with safe slime ingredients - we'll unearth invaluable slime tips and tricks.
Don't you just love the idea of merging learning, fun, and creativity?
Whether you're looking to entertain your children on a rainy afternoon or seeking to add a new skill to your arsenal, our easy slime recipe and detailed slime tutorial make it as enjoyable as it is educational.
Let's embark on this slime-making art journey together, shall we?
What You Need: Mastering Slime Creation One Ingredient at a Time
Navigating the process of slime crafting might seem like a daunting task, but it doesn't have to be. To make your own slime experiment, you need a few key materials. Nothing fancy, mind you; just standard pantry items or things you can easily find at your local grocery store. Start off with some glue - the all-purpose white one works best. If you want to enhance the texture, shaving cream is your friend! It gives your homemade slime an extra fluffy edge! A pinch of baking soda helps perfect the slime consistency, and contact solution acts as your 'slime activator'. To jazz things up, food coloring or glitter could be fantastic add-ons to give it that special touch!
DIY Slime: An all-inclusive Slime Making Guide
Roll up your sleeves! It's time to immerse ourselves in the exciting world of DIY slime. Begin by pouring the glue into a bowl. If you're planning on a fluffy slime experiment, here is when you'd add the shaving cream. Mix these ingredients well until you achieve a homogeneous mixture. Then, sprinkle in your baking soda and make sure to stir it until well-distributed. By now, you should start to see your slime formation. But hang on, we're not quite there yet!
For the slime activation process, slowly add in your contact solution. It's crucial to do this gradually while you keep mixing, so that you can better control your slime consistency. Want an extra tip? The more activator you use, the harder your slime will be. So, avoid putting too much if you're aiming for a soft, stretchy slime.
Once you have everything well mixed, it should start pulling off from the sides of your bowl. Congratulations, you're officially a slime craft master! Now, taking it out of the bowl and working it with your hands might seem a bit messy. We agree! But no one said mastering slime creation would always be tidy! If you find your slime a bit sticky, adding more activator should do the trick.
Painting Your Slime Creation
With the core steps of the easy slime recipe completed, you can let your creativity run wild. Pick your favorite food color and add a few drops. Remember, colors can deepen over time so add a few extra drops if you're craving a more vibrant result. If in the mood for a dash of sparkle, scatter some glitter. Blend well until your colorant and glitter are well-incorporated into your perfect slime.
This is where the fun with slime really begins! Try drawing pictures with your dyed slime on a piece of parchment paper or stretch it and watch the colors swirl. The magic of slime is that there are no limits to how you can experience it. Every time you make your own slime experiment, the possibilities for fun and learning seem endless!
And there you have it! The Wonderful, Wide World of Slime Revealed
What started as a simple DIY project has now become a fun and educational journey into the realm of creativity and science. As each slime creation transforms from ordinary ingredients into a stretchy, colorful wonder, remember this isn’t just child’s play.
Each batch of slime is a testament to your problem-solving skills and innovative spirit. I hope this guide has empowered you to create and explore without limits. So, keep trying, keep experimenting and most importantly, keep having fun with your slime.
Here’s to your next great slime adventure!

You May Also Like These:
STEM Project: DIY Solar System (March 8 Edition)
Materials Needed:
- 1 large foam ball (for the sun)
- 9 smaller foam balls of varying sizes (for the planets)
- Acrylic paint (various colors for the planets)
- 9 Wooden skewers
- A piece of cardboard or plywood as base
- Printed labels for each planet
- Glue
- Paint brushes
Instructions:
- Begin by painting your foam balls to resemble the planets. Paint the large foam ball yellow to represent the sun.
- While the paint dries, prepare your base. Place the sun in the center of your cardboard, and mark where each of the planets will go based on their distance from the sun on March 8. Look up this information together with your child and talk about why these distances might change over time.
- Once your planets are dry, insert a skewer into each one. Make sure you place them in the order they would appear in the solar system, starting with Mercury closest to the sun.
- Glue the skewers with planets into their appropriate spots on your cardboard base. Make sure to vary the length of the skewers to create a more three-dimensional look.
- Print out and affix labels to each planet. This is a great opportunity to learn more about each planet as you go along.
STEM Project: Paint Color Mixing
Objective:
Learn about color theory and mix different colors using primary colors.
Ingredients:
- Red, Blue, and Yellow Paint
- Paint Brushes
- Mixing Palette
- Paper or Canvas
Instructions:
- Squeeze out some red, blue, and yellow paint onto your mixing palette.
- Take your paintbrush and mix together equal parts red and yellow to create orange.
- Next, mix equal parts blue and yellow to create green.
- Then, mix equal parts red and blue to create purple.
- Try creating other color variations by adjusting the amount of each paint color you’re mixing together.
- Finally, apply your newly mixed colors on the paper or canvas to see the shades you’ve created.
Colour-Based STEM Project
Ingredients:
- WaterColors: To create exciting and vibrant designs.
- Paint Brushes: For applying the paints.
- White Paper Sheets: To paint on.
- A Palette: For mixing paints.
- Water and Cloth: For cleaning brushes.
Instructions:
Step 1: Set Up Your Painting Station
Ensure your table space is neat and ready. Lay out all your painting materials. Protect the surface of your table with a covering if necessary.
Step 2: Prep The Paints
Open your paints and place them on your palette. You can mix different colours to create more.
Step 3: Start Painting
Use your brush to collect some paint from the palette and apply it to your paper. Feel free to explore different shapes, symbols, and patterns.
Step 4: Cleaning Up
Don’t forget to wash your paintbrushes thoroughly after you’re done painting. Leaving paint on your brushes can ruin them.
Step 5: Drying Your Painting
Leave your painting to dry in a safe place where it won’t be disturbed. Enjoy your unique piece of artwork once it's dried!
Water Filtration System STEM Project
Date: 2025 - Understanding the importance of clean water for our future
Ingredients:
- 2 Liter Plastic Bottle
- Gravel
- Sand
- Cotton or Cloth
- Clay or Soil
- Dirty Water (for testing)
Instructions:
- Cut the bottle in half.
- Invert the top part of the bottle and fit it into the bottom half like a funnel.
- Add a layer of cotton or cloth at the bottom of the funnel.This will act as the final stage of filtration to trap any remaining small particles.
- Add a layer of sand next. The sand will form a natural barrier for larger particles and contaminants.
- Add a layer of gravel on top of the sand. Gravel further assists to filter out larger impurities.
- Finally, pour a layer of clay or soil on top. The clay or soil will help to attract particles from the dirty water.
- Slowly pour the dirty water into the bottle setup. Pay close attention to the water that seeps through the filtration system, as it should be clearer post filtration.
- Discuss the relevance of clean water and water filtration. Explain how this simple filtration process is similar to natural filtration that occurs in nature. Also, you can talk about the future challenges of clean water availability and why science and technology must work to provide solutions for 2025 and beyond.
Charcoal STEM Project
Ingredients:
- Wood (Preferably hardwood)
- A metal drum with a lid
- Metal wire
- Metal tongs
- Gardening gloves
- Safety glasses
- A long stick
Instructions:
- Ensure you start this project in a safe, open outdoor environment.
- Put on safety glasses and gardening gloves.
- Get your metal drum and clean it out, ensuring there's no residue or debris inside.
- Fill the drum with hardwood. Do not overfill; leave some space for the wood to move about.
- Secure the lid on the drum using the metal wire. Make sure it's snug and tight.
- Start a fire under the drum. The goal is to heat the drum but not set the wood on fire directly. The process of heating the wood without burning it will turn it into charcoal.
- Maintain the fire for about 3-5 hours, or until smoke stops coming out from the drum.
- Allow the drum to cool completely. Handle with caution once it's cool, as the materials inside are still likely to be very hot.
- Using the metal tongs, remove the charcoal from the drum.
- Congratulations! You now have homemade charcoal for your STEM project.
Remember:
Always prioritize safety when attempting this project. Parental supervision is mandatory at all times. Only handle heated materials with protective gear.


